
Source of original piece: closet of family member. I never could wear it for reasons that will be obvious in the “before” picture.
Assessment: It is a size Small and here’s pre-upcycle proof. It needed width from the armhole-level down. The neck is a size small but not too constricting. Teeny tiny buttons and button-loops are so small, they belong on Barbie clothes….
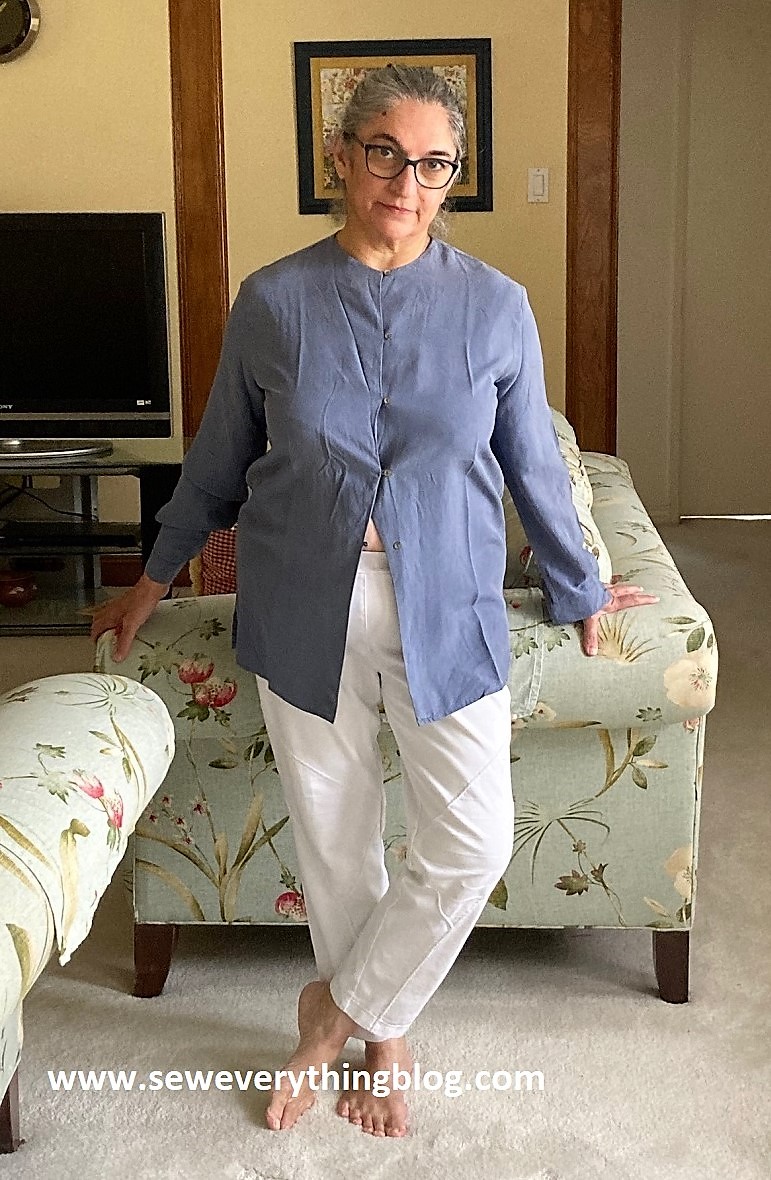
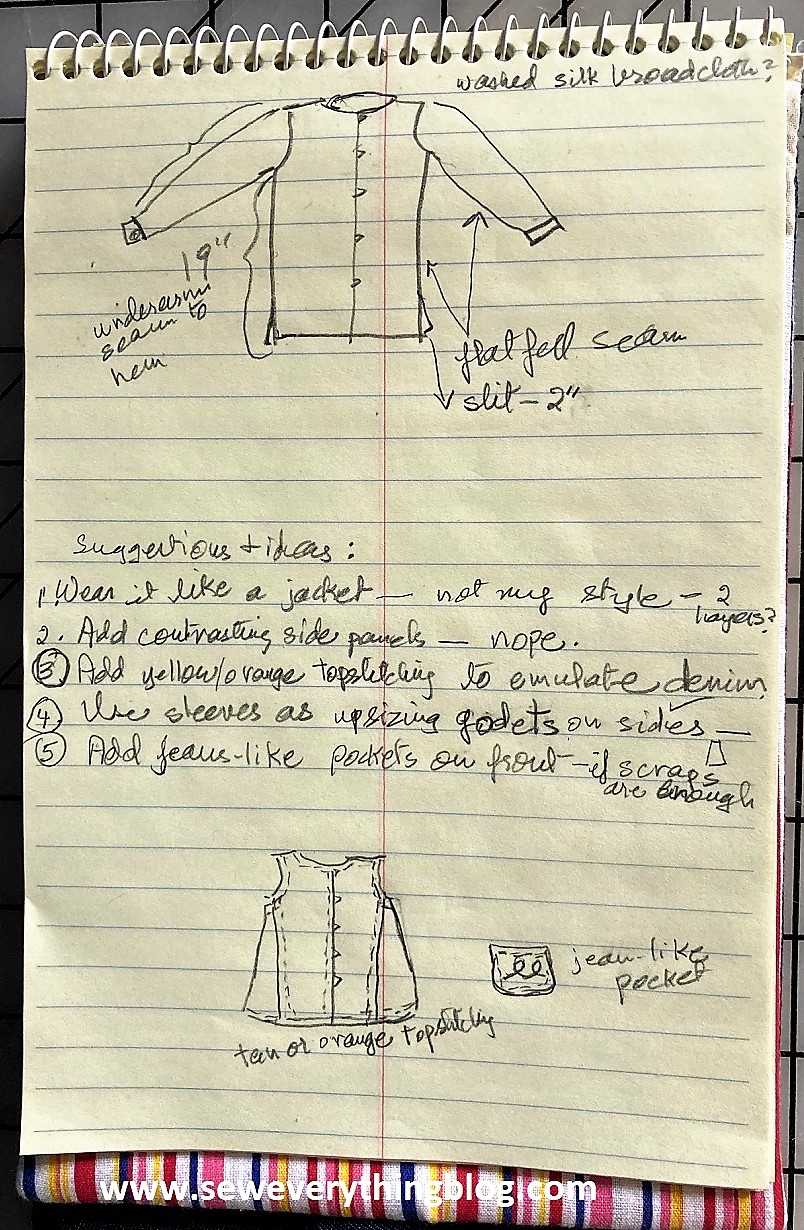
Thought process (thinking and planning took longer than the actual construction): Redesign was based on personal style and available fabric. I took the challenge to enlarge the girth to fit me, especially around the prominent tummy. I also re-configured the style lines on paper, and ended up with my go-to silhouette (pear or A-line). The drapey comfort and the mottled blue color of the silk broadcloth are a total plus. Yellow topstitching was an idea to add a jeans vibe; but the tiny buttons stayed on for now. It helps to work it out on paper; do you do this too?
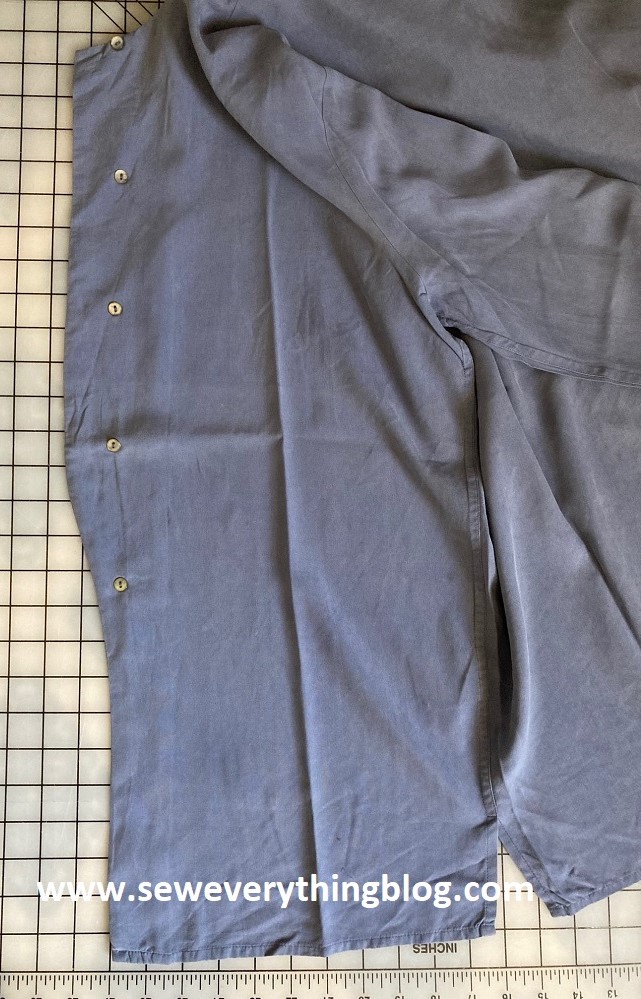
Here’s a detail of the front button lap — I find it interesting that it is shaped wider in the buttons/button-loops area and swerves back where the buttons end.
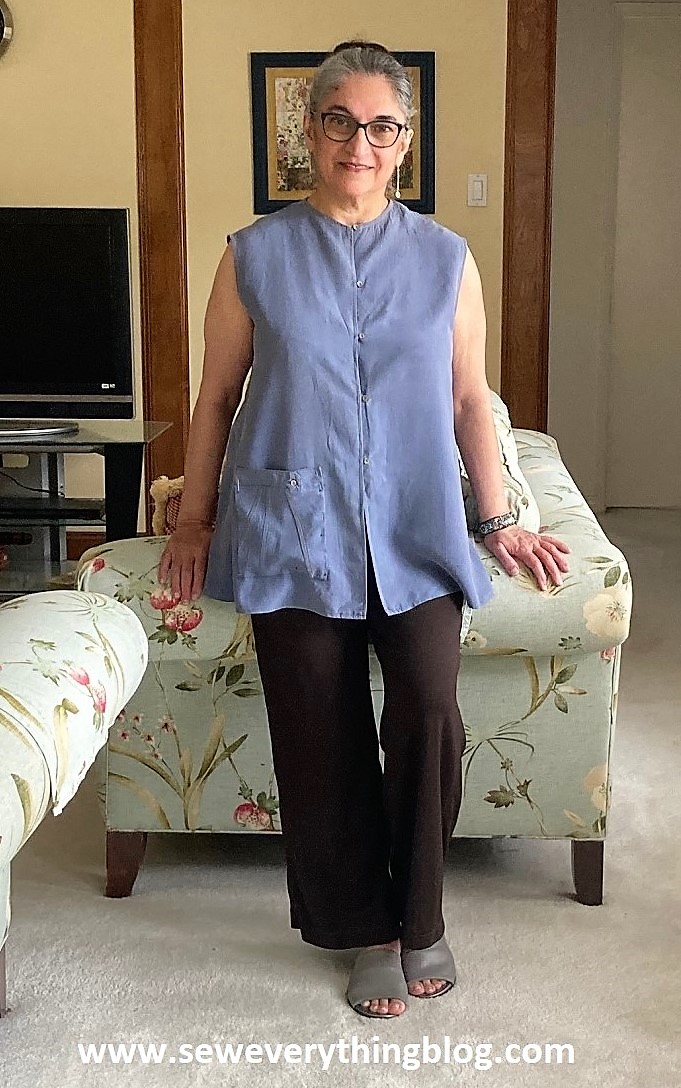
When it all came together, I ended up with this, below. The pocket is pinned on in this picture because I wanted some feedback from my dear readers on using it. Sorry, it has been sewn on since the photo was shot without your input. I still want your opinion. Is the pocket a good touch, or nah? About the brown ponte knit wide-leg pants (fabric from Sew Much Fabric); they are part of my new summer color palette to be featured in the near future. Who says you can’t wear dark brown in the summer??
In the sewing trenches:
Machine Needle: Because this silk broadcloth is very tightly woven, nothing but a Sharp machine needle would do – no Universal needle nonsense for this fabric!
Cutting apart: cut the sides apart all the way from shirt-hem to sleeve. Then, the sleeve cuffs were removed, leaving about ½” on the cuff side for seam allowance (stay with me here). This blue girl was constructed with flat-felled seams and I wasn’t about to unpick them; therefore, after cutting apart the sides from one side of the seam, I removed the entire flat-felled strip; now we have a nice raw edge on the sides of the garment.
My advice: unpick only if you have to.
Sleeves were the source of needed fabric: I cut away the sleeves from the body so sleeve fabric could be used for adding triangle side panels. Important tip: When cutting away the sleeve cap from the armhole, leave half inch on the armhole to use as a “facing” to finish the now-sleeveless garment.
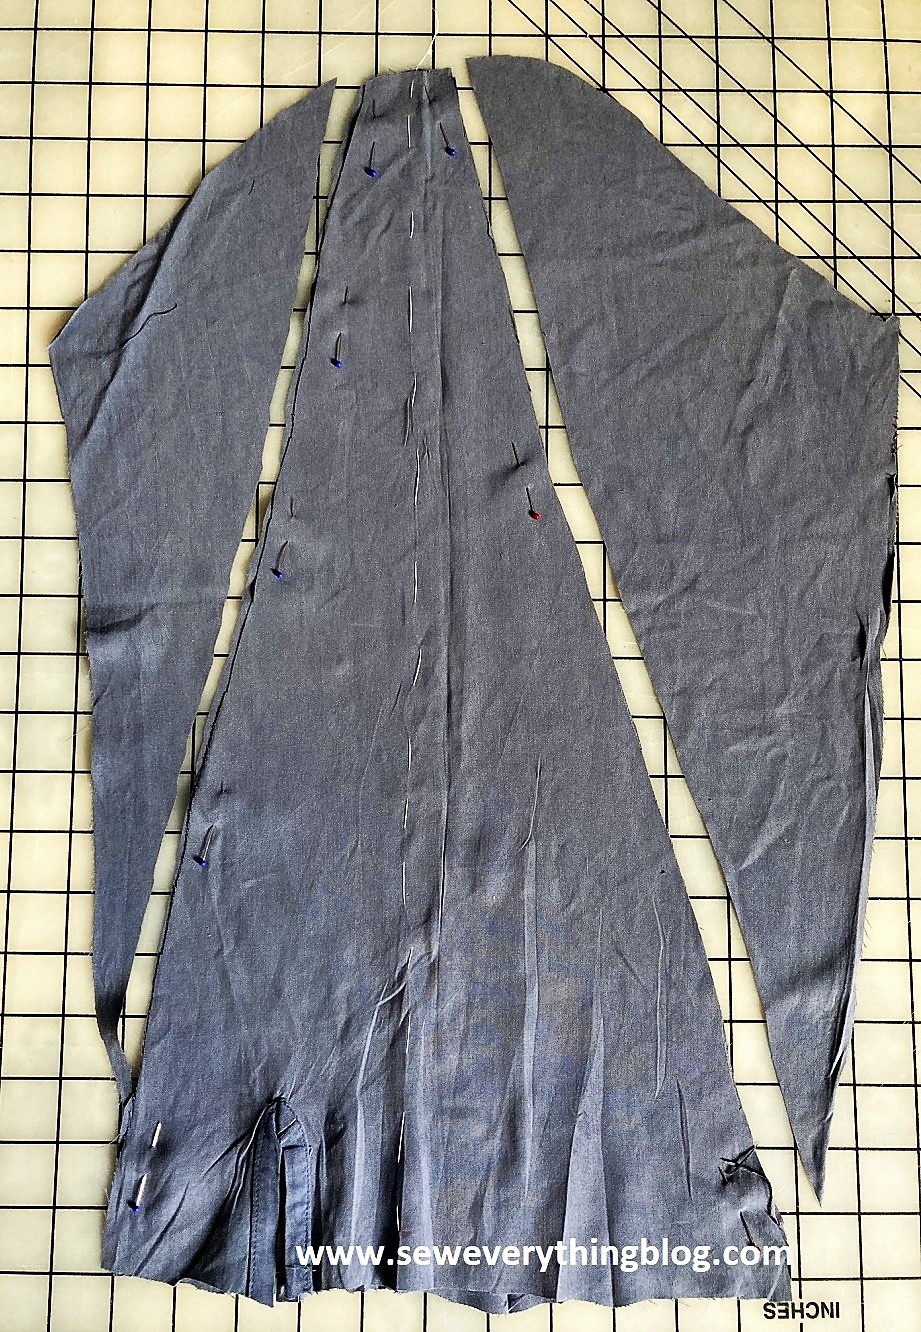
Everything got pressed smoothly. The triangles were stitched to the sides of the body front and back from the wide edge bottom to the narrow edge top (which ends at the underarm). Same process was used for all four seams (two front and two back); technically there is no “side seam” — why create one when there is no need? I considered using the flat-felled seam as in the original, but decided I could get the same effect by serging seams together and topstitching from the right side.
Topstitching: It isn’t obvious in the picture but it’s there in yellow thread; it would have been more prominent if the tightly woven fabric had not rebelled against thicker top-stitching thread and needle.
Maximum use of available material: Scraps from the sleeve, and sleeve cuffs are put together to make a pocket. The other cuff got thrown away, but I did what I could to reduce the “footprint”. Yay.
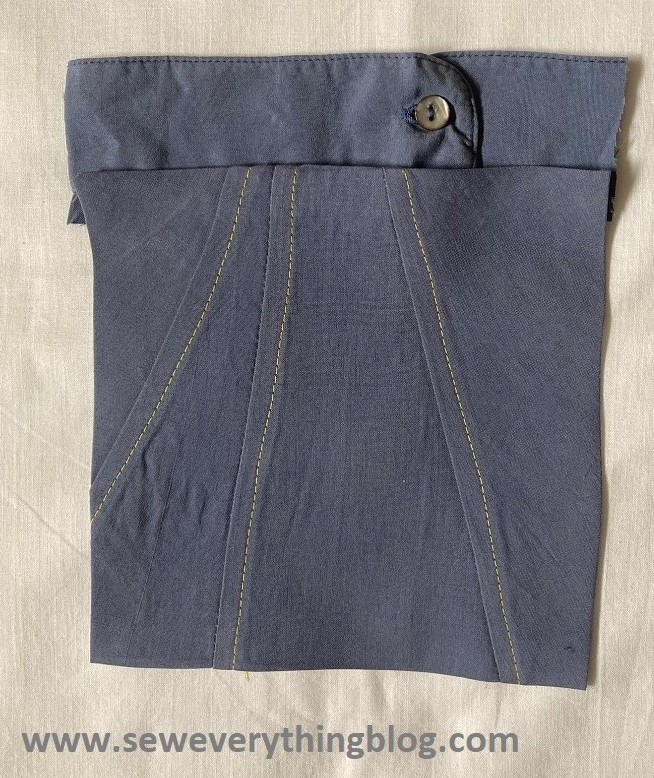
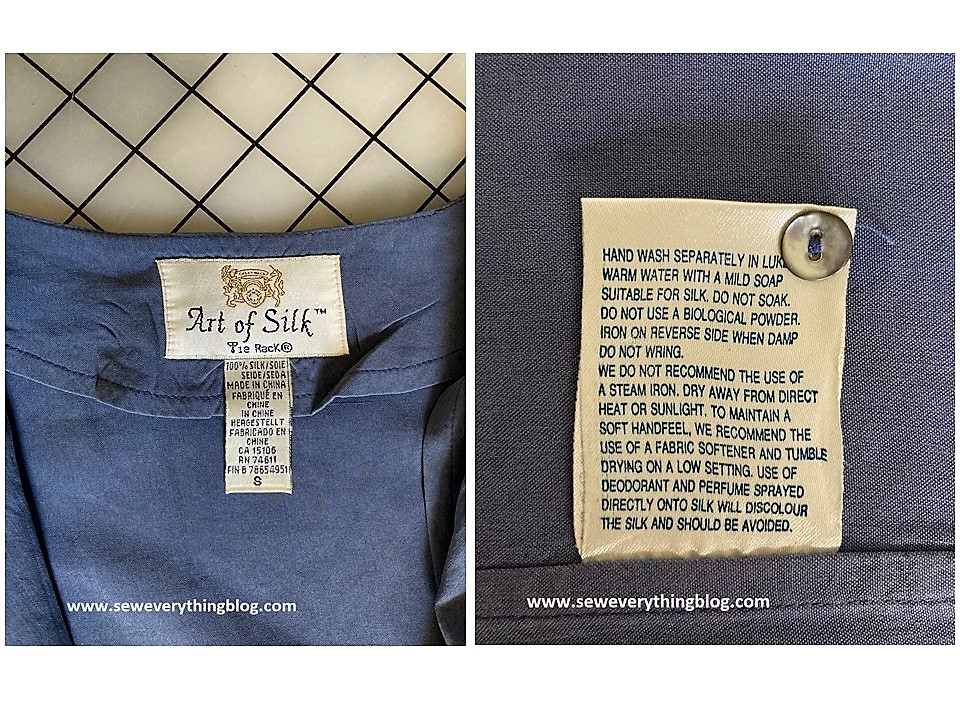
Label incorporation: It’s nice if the original labels can be included in the upcycled garment, because there’s the manufacturer, fabric and care information on them. The brand label stayed on the back neck, and I made sure to incorporate the fabric and care info label back into one of the vertical seams.
Okay, readers, have a great week. I want to continue upcycling/refashioning in April, but we’ll see. My yardage stash is feeling neglected right now; but I find refashioning utterly satisfying.
Samina

Good morning Samina! You did such a wonderful job with this top – I think it’s fantastic! I think the pocket is a fun touch, especially since you up-cycled it, it’s a gentle reminder that it was recycled, but doesn’t have that “recycled” look. It looks very good on you; I like the brown pant better than the white.
I do that too with many of my husband’s shirts, faux flat-felling – using the serger and topstitching the seam down. You can’t tell from the outside. You always do such excellent work!
LikeLiked by 2 people
Thank you, Kasey! I like your take on the pocket — hints at the recycled origins without being too obvious.
LikeLike
You look great in your refashioned top. Appreciate the details of the remake. Pocket definitely stays!
LikeLike
Thank you, Lenora! It turned out pretty good, didn’t it? I see it being worn a lot this summer and our so-called “Fall” season. Lol.
LikeLike
Great restyle, Samina! Really attractive on you, and fun with the topstitching. The pocket is one of your signatures, I think!
Personally, I utterly dislike upcycling, which I regret. I love the creativity of taking fabric from a bolt and deciding what suits it and me. But I fully recognize that upcycling is, ethically-speaking, likely superior!
Love your smile in the second photo!
LikeLike
Thank you for the compliments, Joan! Yeah, I brought on my Mona Lisa in the second picture. But really, That newly upcycled top felt so good to wear, the smile (such as it is) was pretty spontaneous.
Making clothing from “yardage” is as superior as upcycling — so keep doing it. Sewing from “scratch” is what I do most of the year.
LikeLike
The pocket is a definite must!
LikeLiked by 1 person
But, of course! ❤
LikeLike
Thank you for sharing the details and inspiring me in up cycling clothes. One of my chief problems is having blouses fit across my ample bust which is out of proportion to my hips. I’m inspired to try this way of fitting. P.S. I like the pocket
LikeLike
You are welcome! Good fit is one of the reasons I sew. I am thrilled when a reader is inspired by my post.
LikeLiked by 1 person