
Today’s task for #blogging101 asks us to identify our ideal reader and address this post to her/him, plus include an element not used before .
About the audience: this is a niche blog and my target audience (or dream reader) should be easy; any one of the following, and more, qualify as my ideal reader:
1. One who sews.
2. One who wants to hone his/her sewing skills
3. An accomplished seamstress. I really do like to address my posts to this reader – in the spirit of showing off! We seamstresses tend to take any opportunity to show off our creations.
4. Sewing book & magazine editors. I want to direct this group’s eyes to my blog. My projects have been published in sewing magazines over the years, but not enough; not for lack of submitting materials, I might add. A book? H—, yeah.
5. But today, I will address this reload of a previous post to a group of people I become a fan of every season: Project Runway Contestants! I love the show on Lifetime TV; its thrilling to see the creativity struggles of the contestants, and to see a punk create exquisitely feminine fashion.
Why a re-post? Because this happened today:

Kitchen mishap where I’m having to type without my right thumb, and I cannot use scissors to actually sew.
Another thing with a DIY blog: it has to be very pictorial. Just words never really work for demonstrating sewing, crafts and other handwork. That is why, it’s takes a lot of creativity to blog daily.
Today’s Daily Task also asks us to include a new, never before used element in our posts. I’ve never embedded videos, which would have been ideal for demonstrating this re-post. Um, I have NEVER shot videos, and will have to be serious about doing it in the near future. But I will have to forego that part of the assignment. Sorry, blogging101!
So, the following post was published two years ago, when one of the competing Project Runway designers did not know how to make a French seam. I was appalled, but happy that it gave me fodder for a blog post. So, all future PR designers, I’m talking to you here, in case you don’t already know how to sew a French seam.
——————————————————————————-
Hi there, future Project Runway designers! As promised, here is a tutorial on how to make a French seam. Let’s get started.
First, I’d like you to see this image of a silk organza jacket. Can you spot the French seams? Usually, it is used in sheer fabric such as chiffon, silk organza etc. But it’s also known to be used in other, denser textiles. It’s just a fantastic way to finish the inside of a garment.

This is what you will need besides your actual fabric:
- Sewing machine – obvi
- Machine needles suitable for thin, sheer fabric. I used size 8
- Fine silk thread (it can be any fine thread not necessarily silk),
- Sharp scissors,
- Fabric marking pen with disappearing ink
- Ruler

Begin by marking your actual seam line. I marked a 5/8” seam line on my sample here. I used the FriXion pen which disappears when ironed but feel free to use any other method for marking. With a couple of French seams behind you, you may not need to mark the seam at all. You’ll see why later.
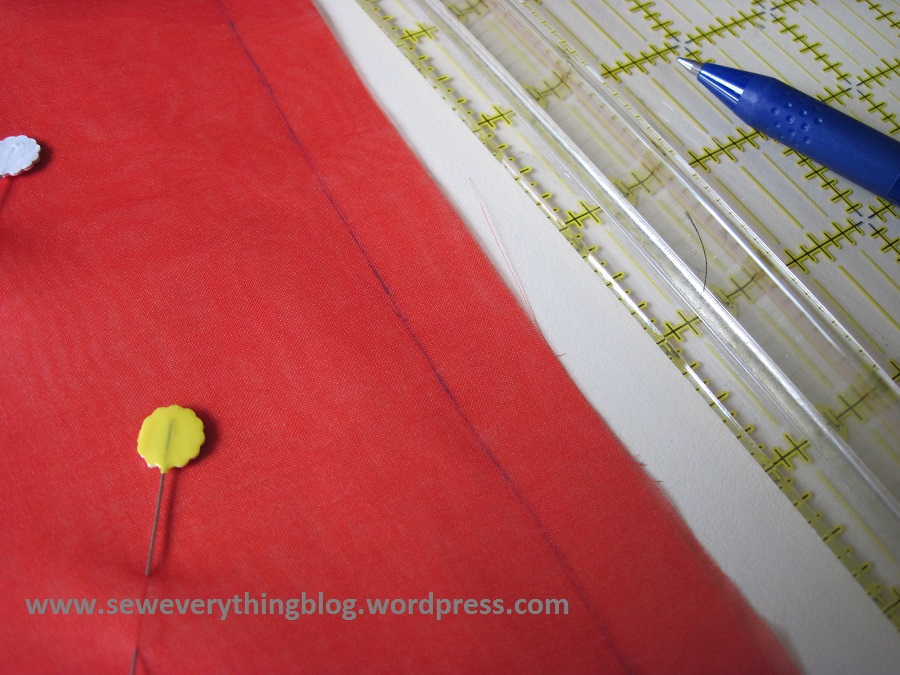
Pin the two pieces of fabric WRONG sides together (yes I typed that correctly). Above, I’ve marked & pinned the fabric.
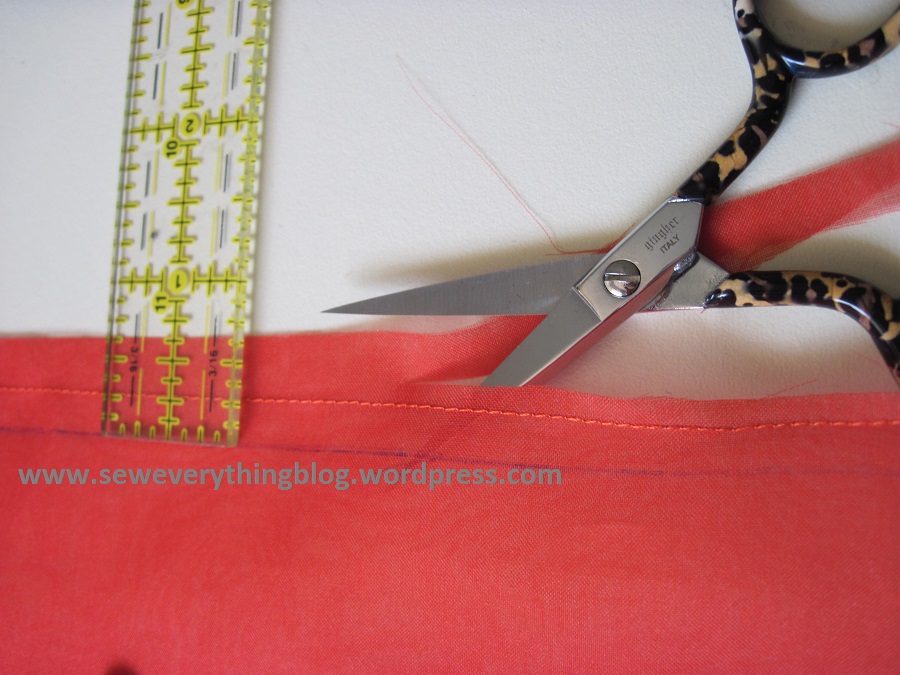
Sew the seam 3/8” from the edge which really means that you are sewing ¼” inside the actual marked seam line. Be sure to “sew a fine seam” (can’t resist using that term), by which I mean use a small stitch setting. I used the 2.5 setting on my Bernina.

Trim the seam to 1/8”. Press it, then press to one side. Turn the project over and press on the seam again.
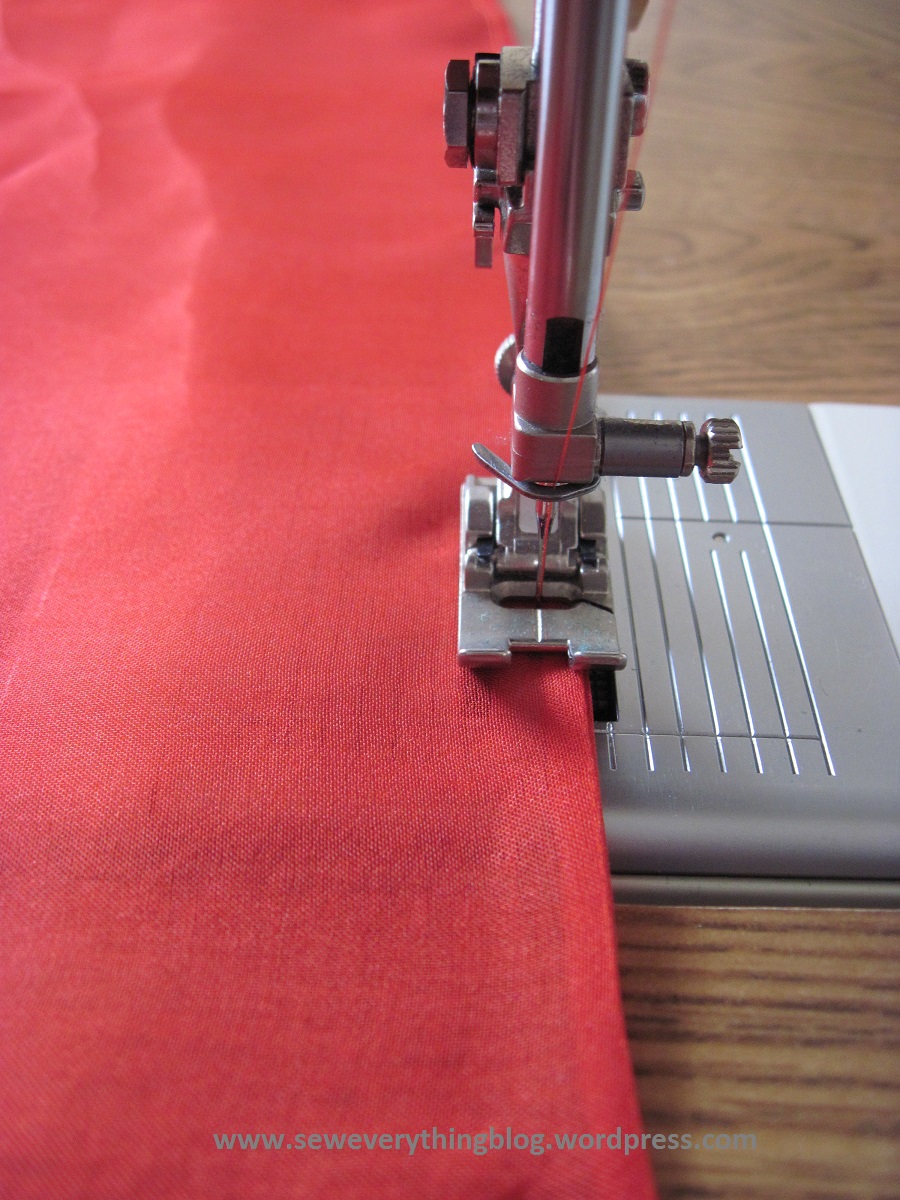
Fold project on the stitched line, this time RIGHT sides together, enclosing the little 1/8” seam. Pin, or baste on the actual seam line (previously marked). At this point, my seamline marks have disappeared, and it’s OK. Press well.

Sew a generous 1/8” from the folded edge and give it a good press.
Voila, le French seam! Pretty, non?

Good luck. I’ll be watching…………..
Samina
Dear readers, do you use the French seam often in your sewing? Please feel free to add your thoughts in the comment section. Thanks!
Samina

Posting daily is a big undertaking. It would leave less time for sewing! For a different element, have you ever tried a poll?
I don’t do french seams on clothes because I keep changing my seams and want to be able to make alterations. I’ve made mock french seams though.
LikeLike
Daily posts ARE difficult. I started with enthusiasm but other things got in the way, and I had to pull back — as you can see. At this point I must tell you how much I appreciate your regular comments!! Did you notice that I used your suggestion in the tag line under the header? Thank you for that.
LikeLike
Great tutorial with images! I am always searching for tutorials on different sewing techniques. Your tutorial is easy to follow!
LikeLike
Samina, I hope your thumb heals quickly! I do use French seams in my sewing. I find them an easy way to finish so many types of fabric. I put French seams in doll clothing to help it stand up to children’s play and frequent washing, and in pillow cases for similar reasons. And they’re a must inside sheers as your tutorial so nicely illustrates.
LikeLike