Hi there, Readers!
Today, I’m telling you about a WIP (Work in Progress), which was supposed to be a finished project for this post, but life got in the way of completing it. Stuff happens.
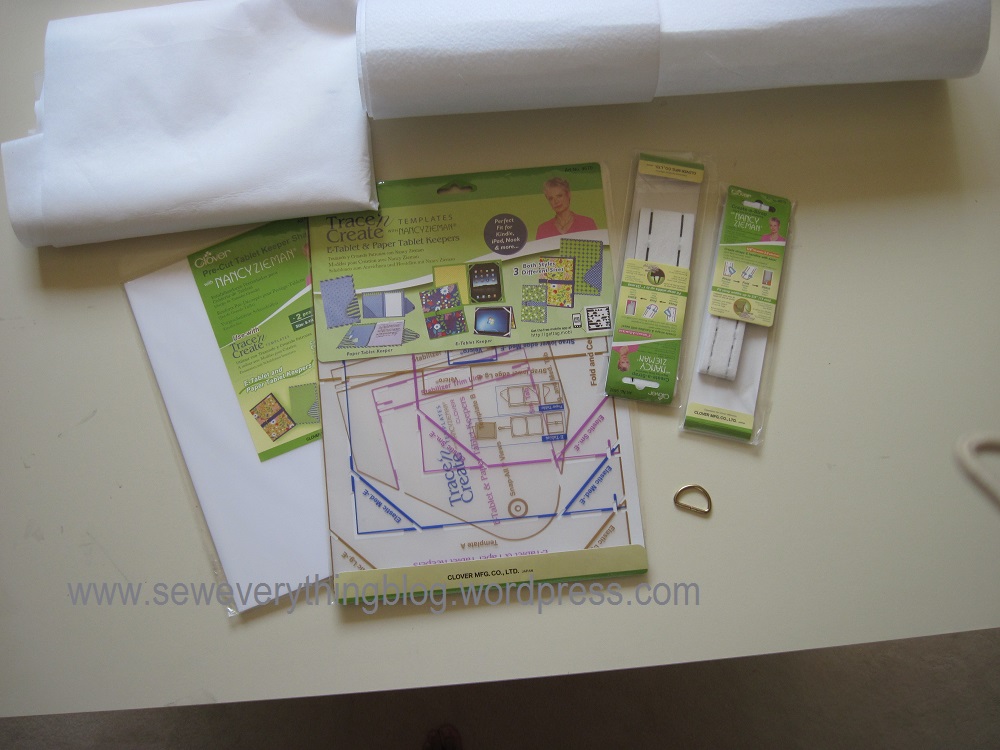
This is my first experience with a Trace ‘N Create template, designed by Nancy Zeiman and produced by Clover. I have no affiliations with either company. This particular template is for Tablet Keepers – electronic or paper – in three sizes. The WIP here is an iPad keeper for which the medium size template is used, and I’m making one without owning an iPad. Long story…
In the first picture you can see the template, and sundry notions, and below that is my progress so far. Main pieces are cut and interfaced, binding strip and the narrow spine strip is cut and ready, the closure strip with Velcro and d-ring attached, and just starting to attach elastic holders on the corners of the pink interior.

So far, these are my thoughts about the product and process:
- I suggest that you read the instruction sheet a couple of times to make everything clear, especially if you’re a beginning sewer, or making this project for the first time. I also recommend that you watch videos (this particular one focuses more on embellishment) on Nancy Zieman’s site, or read this informative post on her blog. I recommend reading this post first.
- My initial response to a new-to-me project is: “How hard can it be?” (insert smug look here). I did however, did a lot of watching and re-reading before starting on the Keeper.
- I ordered the Clover “notions” just to use whatever the designer used for making the Keeper. I sort of like to gauge any pattern the same way – make the first one the way the designer intended. However, after the first time, there are some supplies that can be substituted for the recommended ones, such as the plastic “Keeper Shaper” by Clover. Plastic needlepoint canvas (or any plastic sheet of similar weight which can be cut to size) is a good substitute for the pre-cut shapers sold separately by Nancy’s Notions. Word of advice: do not skip the plastic shapers/inserts. They are key to protecting your electronic device.
- Nancy recommends using non-slip elastic headbands as a substitute for the polyurethane elastic corners holding the device in place. I’m not sure the headbands I’m using are non-slip. Will have to wait and see.
- The one thing I’m waiting to see, and which prompted me to read the instructions several times, is the ¼” edge to which the binding is applied. Is that really enough of a seam allowance for a sturdy binding? The videos do not touch on the binding process in detail; just Nancy asking us to use our favorite binding method. We’ll have to wait and see about that, too.
- I also wondered how the binding could be applied with the plastic already inserted – until I dug in again, and found out the exact size of the pre-cut plastic shapers for the medium size. Each plastic piece is about an inch smaller than the fabric rectangle. That’s do-able. I bought the large size shaper, assuming it could be cut to size, but in hindsight should have ordered the pre-cut assortment. According to the package, the plastic can be cut with a rotary cutter. No biggie there.
- As I work on this, I was reminded of the fact that interfacing a piece with a fusible WILL shrink it a little bit (the pink fabric shrunk a smidgen more than the plaid even after I soaked the interfacing in warm water and air dried it). I’ll have to “fudge” it this time (as in push, pull or take a slightly larger seam) but next time, will interface an approximately cut piece before cutting it to the exact measurement.
- Idea videos: I recommend – again – that you watch the video linked in #1 where embellishment of the basic Tablet Keeper is demonstrated, which is fun to see. Some are embroidered with initials and social media icons, others are made with quilt blocks, and still others are from re-cycled garments. Nice and very gifty.
So, wish me luck in completing this project successfully. I need some successes these days.
Nancy Zieman and Clover sell two different Tablet Keeper templates, the original and the Tablet Keeper 2.0 for newer sizes, because the electronic industry keeps changing the size of each upgrade – of course. Nancy Zieman has kindly provided a list of tablets if you want to see whether you should order the original or the 2.0 template. Click here for the original tablets AND here for the next generation.
By the way, the Trace ‘N Create templates are available for bags, purses, and quilt designs! Anything to make things easier & faster for sewers and makers is a good thing.
Have you made this tablet keeper? Have you used a different method, or design for your e-tablet? I would love it if you commented below, whether your interest is in a paper tablet keeper or an electronic one.
Hope you have a great summer.
Samina

I didn’t know about templates for projects. I read tutorials and watch you tube videos for how-to info. Hope the stuff you’re dealing with works itself out. Good luck on finishing the tablet keeper; I don’t think you need it with your skills and creativity!
LikeLike
Thank you, Lisa! I’m always game for trying out new stuff. Buying the gadgets, commercial templates etc can get expensive but I always hope that using them multiple times will lower the cost-per-use. I’m seeing this template as something to use many times. And, sure enough, as I make more, I’m sure there will be creative adjustments :). Will be posting the completed tablet keeper soon!
LikeLike
Any time i say ‘how hard can it be’ i always find out exactly so. I have not made a tablet keeper because i don’t have one. But there are so many cute ones i will when i get one.
LikeLike
Good luck to you! I hope you have positive results, just like so many others. When you finish, please post a photo on my Facebook page if you’d like!
LikeLike