As history records everyday lives of Americans & Europeans during the second World War, the spirit of Make Do and Mend was the prevalent vibe among women, regarding their clothing and fashion choices. The same spirit prevails in 2013 but it is called Remake and Recycle; and it’s not due to wartime necessity, but due to an eco-conscious and consumption-weary outlook.
To celebrate Earth Week, I’m posting my favorite re-make, which I did several years ago.
(Disclosure: This project appeared previously on the American Sewing Guild blog last year (I wrote the ASG blog during my employment there), and has shown up on a Pinterest Board – somewhere. It is now pinned on my own Pinterest board :).
Let’s start.

The original cashmere cardigan was a light green, much loved piece which had started to pill and generally looked worn and sad. It was also aging the wearer (me). For my age demographic “aging” is a sensitive term. I decided to re-make the cardi into a scarf, and before I knew it I had ended up with two gorgeous scarves.
Since this re-make was done a few years ago, when this blog did not exist, I do not have many pictures of the process. I’ll try to explain it as clearly as I can. As always, you are encouraged to ask any question in the comments!
Start the re-fashion by removing the buttons and grosgrain ribbon from the front edge. The entire buttonhole strip was removed from my cardigan. The upper portion (yoke area) of the cardigan should be separated from the lower portion by cutting right through the fronts and back just under the armholes/sleeves. Put aside the yoke/sleeve portion. Lay the rest of the cardigan out flat; cut the flat piece horizontally, in a predetermined width (desired width of scarf), starting from one front end, through the back and ending at the other front. My scarf width is 6″. A wider scarf width will yield smaller length. Cut as many as the cardigan will yield. A larger size cardigan can yield more strips. These strips are your scarf base. Join the strips together to make the scarf length as long as you wish. My cardigan yielded enough to make two scarves.
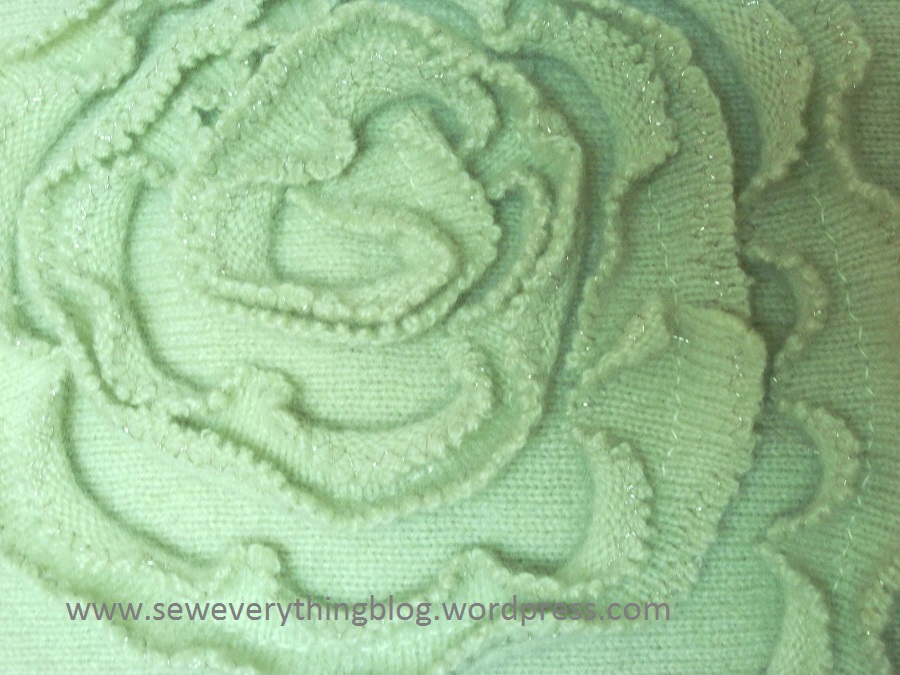
Swirly embellishment scarf

Thread the sewing machine with either matching thread or a silver metallic thread like I did, and zig-zag the two long edges of the scarf base, stretching the knit fabric to get a lettuce effect (lettucing). You can also use a serger for this process. I used a sewing machine rather than a serger to get less thread in the knit fabric.
From the rest of the cardigan (sleeves and yoke) cut thin strips horizontally, approximately 1 – 1 ½ inches wide or according to your personal preference. After you have cut enough, start lettucing both long edges of all the thin strips. It sounds like too much work, but it’s a quick process. You don’t need to join the strips, and you’ll see why later.
Lay out the scarf base on your table, and determine centers of the “swirls” evenly down the scarf length by marking the centers with a pin. My scarf has 8 swirls in “sets of 2”. It means 8 swirls = 4 sets. The picture above will explain the “set”, I think. Start pinning the strips into swirls as I did starting from the center of the first swirl, refer to the close-up below. Once it is pinned to within 1/2″ of the side edge of the scarf, continue the strip towards the next swirl – this time you will be making the second swirl from the outside in. Again, refer to the picture above. The second swirl will make up a set of two. When you come to the end of a strip, join the next strip by just overlapping a little bit, as you can see in the close-up. That is why there is no need to join the strips beforehand. We’re working here in an organic, intuitive way. That’s what made this project so much fun and quick, and it turned out beautiful, in my humble opinion. Pin more strips into swirls, and sew down the center of each strip with a shallow zig-zag stitch. Once you finish sewing on the swirls, you’re all set to wear it and go…
Now, go on and dig into your old winter clothing to find a has-been, soft sweater. About the second scarf? Be sure to check in again this week.
 Did you indulge in any re-fashioning lately? I would be delighted and thrilled if you tell us all about it in the comments below, and if you would like to upload a photo to the SewEverything Flickr page, please do so! Happy Earth Week!! As I said before, I am now on Pinterest! Bear with me while I figure out how to include the Pinterest widget…
Samina

Oooooh, it’s fantastic, SO attractive. I bet you would pay a pretty penny for those scarves in the shops. I recycled some placemants into little bags, but have not done too much refashioning in my wardrobe. I hope too as there are a lot of pieces that I just don’t like anymore and need to be upcycled.
LikeLike
Thank you! I love these two scarves, even if I say so myself….
LikeLike
So gorgeous! Feminine and unique. I use a lot of thrifted sweaters for upcycling and I can’t wait to try this decorative technique. Thank you!!
LikeLike