
She is done!

These are my own few tips; feel free to comment and add your own ideas, please.
Simplicity of silhouette because the print is KING.
….. and minimum seam lines within that silhouette, because you do not want to break up the print where it ceases to be impactful. Also, matching up the print can be avoided when there are no seams to match. But, but, but what about a necessary dart. I address the dart below, so keep reading.
Strategic Placement of Print Elements:
By that I mean do not let a prominent, most-attention-getting part of the print land on a spot you do not want to highlight. But sometimes it can’t be helped so go for what suits your purposes.
Edge finishing:
Speaking of silhouette, a solid line on most edges will define and enhance the print, in my opinion. My maxi dress is edged in black fold-over elastic at the neckline and armholes. The other colors of fold over elastic did not work, even though they coordinated with the print. Do you think I should have finished the neckline in another way? Used a facing, or bound the edges in the same fabric? See note about foldover-elastic further down…
The necessary bust dart:
The knit will stretch over my well-endowed bosom; however, the fit is much smoother if I add bust darts. What happens when you do not add a dart?
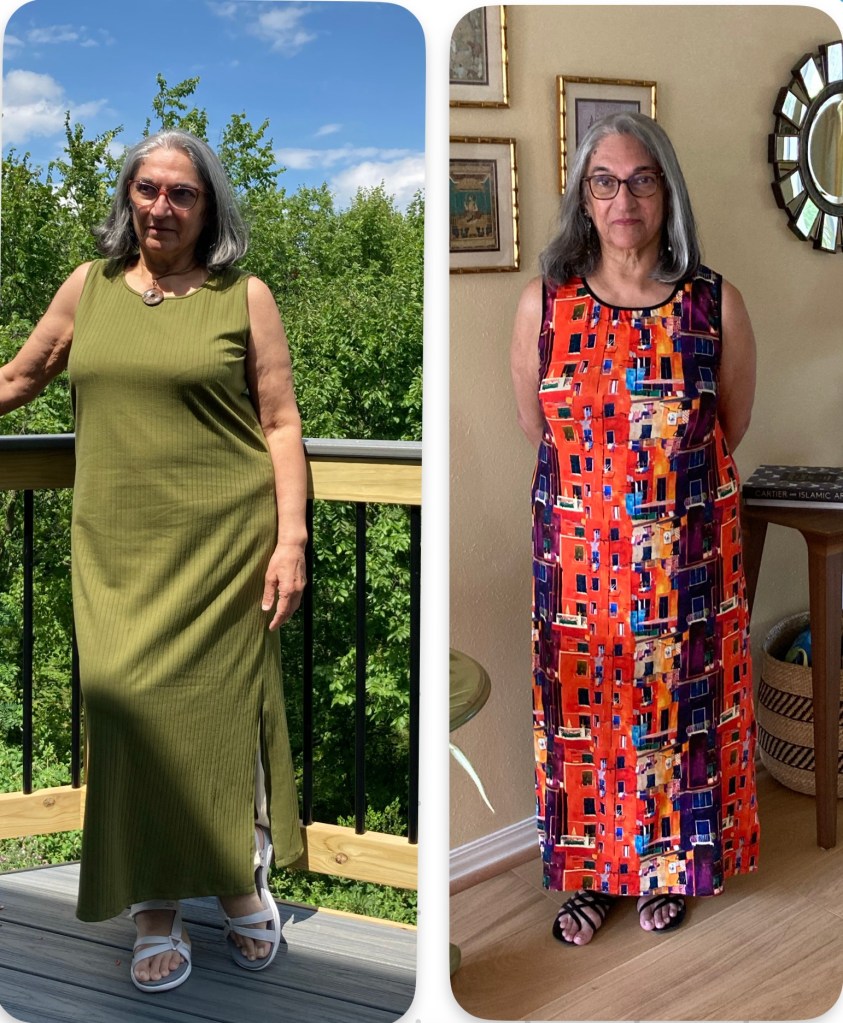
Look at my olive ribbed knit tank dress — folds and “wrinkles” are running amok. So, in goes the dart in the new dress. Miraculously, the bust darts do not show or break up the “high rise” print.
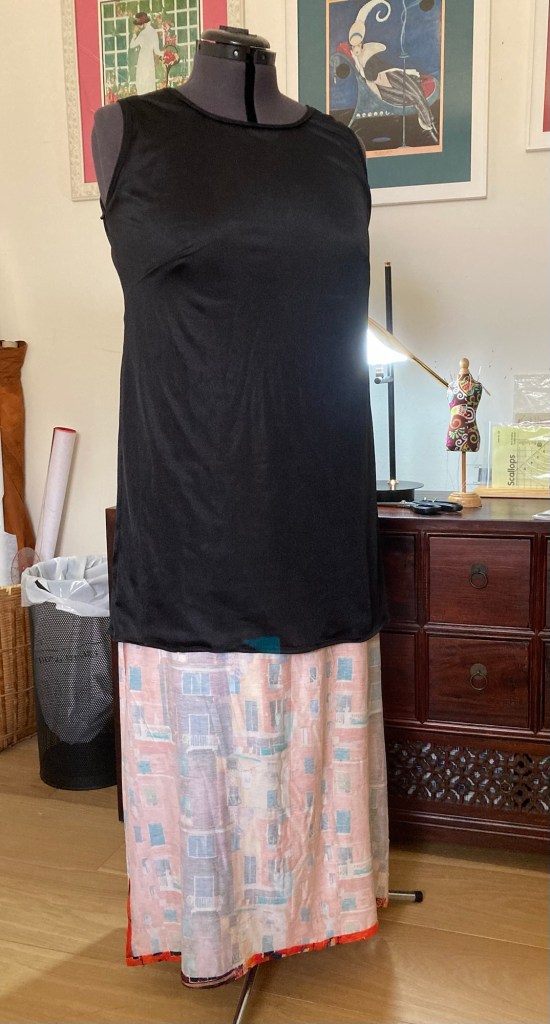
Line this baby….
…. it is 11 ounce jersey and on the lighter weight spectrum; it sits much smoother if lined. How did I work in the lining, you ask? I made the same dress in black stretchy tricot fabric, and before finishing the edges, basted it inside the main dress at the neckline and armholes with the seams facing each other and therefore not touching my body. The rest of the lining falls free. I want to thank Roz of Sew Much Fabric for encouraging me to line knit items.
My lining has a secret…
…. You may not like it, but it is lined up to the knee level only. Major reason for this was lack of enough lining fabric. I could do some piecing to make it full length but decided to leave as is. Why? Because the bodice and hip area which is lined gives me the preferred smoothness, while below the knee there is no lining peeking out. I don’t think you can tell — unless I’m standing against a strong light. Let’s see how it works out.
Finishing the armholes:
I used fold-over elastic for the neck and armholes —- and have lots of thoughts about it. I’ve used this kind of elastic many times prior, but never on a lined item — and therein lay a bit of a conundrum. I will visit this thought process and the execution in a following post. Yeah, all those conflicting thoughts told me I am no know-it-all — I just pretend to be one.
No serger was used to make this dress….
…… not even on the turned-up hem. I think it would have added too much thread on this lightweight knit — but that’s just my opinion. On the other hand, one could make the entire dress (or most of it) on a serger. Then, there is a different set of decisions to be made. We’ll visit those as I keep collecting tank style maxis. When you’re onto something you like, why not have lots of the same thing?
—————————————————
From the image archives (2021)

By the way, in the last post I forgot to include one of my favorite conversational print outfits — loungewear really — in which I spent the pandemic years. It is now exhausted and worn out.
Be nice to each other and sew something.
Samina
