
Dear friends, some sewing has resumed after the thumb fiasco, and it’s admittedly quite unselfish of me to even try and finish the project. In this post you’ll see images of this (almost done) shirt made for my brother, and some Sewing Notes to go along with it. No deep thoughts today.
Sewing Notes
- Pattern: Dress shirt,Vogue 9220, View A


- I’ve referred before to the use of fusible tapes and such to keep narrow hems, etc. in place. This shirt has some fusible thread action going on in the narrow hem and the placket piece. Yes, fusibles come in thread form! See image below. It can be used in the bobbin, and after a stitching line is sewn you can press it down for securing a narrow hem or other such tasks. Late edit: received my issue of Threads today and there is a whole article on fusible thread!

- About interfacing the collar, collar-band and cuffs —- I used a fusible shirt interfacing which is labeled “firm”. Unfortunately, the fusibility did not work that well, despite following instructions exactly, and repeating the process a few times. The interfacing and fabric parted ways as soon as I handled the piece, even after leaving it alone until it cooled. On my to-do list is contacting the seller to ask about it.

- Why are there certain details in men’s shirt patterns, and not in women’s shirt patterns? Take a look at this little gusset inserted at the bottom end of the side seams. Presumably, it’s there to keep the side seams from coming apart with wear. The tiny gusset is a cool feature for slits in side seams, and I’ve decided here and now to use it wherever I can. Win!

- Making a flat-fell seam all the way down the sleeve and side seam is very fiddly (and downright difficult if you’re an inexperienced seamstress). Why? Because the sleeve becomes narrow as it goes down toward the cuff. Have you ever top-stitched a seam in a narrow cylindrical item? Here’s the image that says it all.
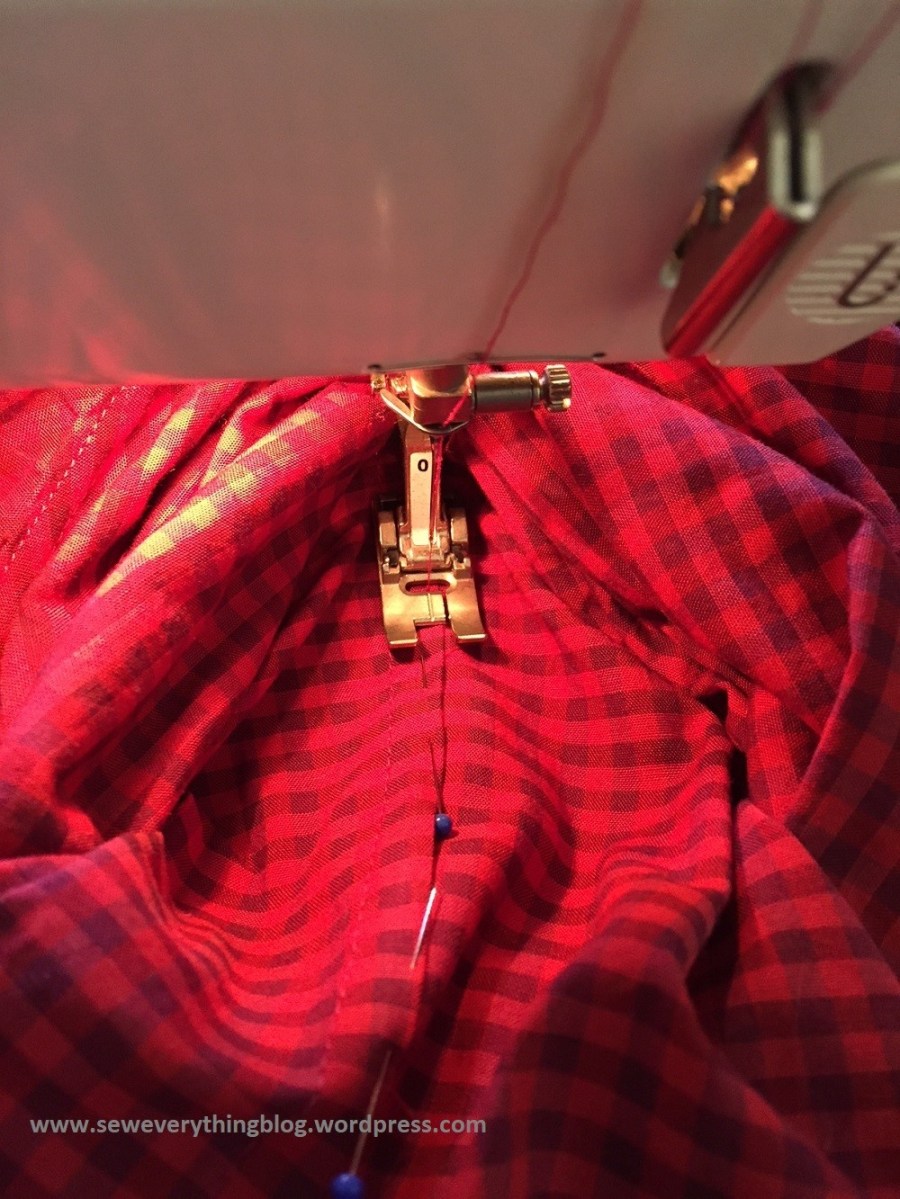
I could have sewn and serged the seam on the wrong side but this is a “dress” shirt and the pattern instructions called for a flat-fell seam. I stayed true to the instructions, and managed to flat-fell all the way down. Someone chime in here; how do professional shirt-makers do this? Thanks in advance!
That’s it for 2019, friends! I’ll see you in 2020.
Samina

Good morning Samina! Happy New Year! Professionals (whether factory workers or couturiers) sew it just like we home sewers do – through the tunnel! (Unless of course they’re hand felling the seam, then you get to turn the sleeve inside-out to work, but I digress.) I know there are felling feet for domestic machines, but whether factory workers use a special foot or machine, I can’t say. What I can say is that the felling foot for my own machine fairly useless.
You will either be sewing into or out of the tunnel, depending on which side you’re doing. I find sewing into the tunnel is easier for me, as opposed to sewing out of the tunnel, which requires you to bunch up all the fabric first as you show in your photo. Yes, you wind up bunching the fabric towards the end, so you pick your evil here I guess. The way I manage to sew both sides the same direction is to move my needle from one side to the other. If your machine doesn’t allow you to move the needle, then yes you are stuck doing each side in opposite directions.
Yes flat-felling seams gives a nice, clean, look. One might even say it’s more of a couture look, as these days some purchased shirts are constructed with a serger and then “faux-felled” with a line of top-stitching so it still looks flat-felled from the outside. I’m going to try this method on my husband’s next shirts, see if I can cut a couple of hours off my time. Won’t that be ironic, a shirt with a collar closed by hand, but serged seams… the benift of making your own, you get to choose which methods you want where! I close the collars (and cuffs) by hand because I find it easier and cleaner than trying to topstitch all those tiny seam allowances closed by machine. I am though considering trying my husband’s shirts with a single-piece collar instead of with a collar and stand; that’s what I use on his short sleeve shirts. I haven’t asked him yet if he would mind, but I get the feeling I won’t like the way it looks – we’ll see! (As an aside, I bought a lovely silk/cotton blend to make him a dress (as in tuxedo) shirt, and I’m planning on hand-felling most of those seams.) Have a good Holiday and I wish you a wonderful New Year!
LikeLiked by 3 people
Kasey, Happy New Year to yourself! Thanks for the detailed comment — love it. I started the flat fell topstitching at the armhole and went down to the hem, then started again from the armhole down through the tunnel to the cuff — as if it made any difference. Pooh. Anyway, since that is the only way its gonna work, so be it. I’ll be eagerly waiting to see how your hand-felling works out on the tuxedo shirt; and with a luxurious fabric, no less. None of the men in my family have occasion to wear a tuxedo shirt, so there’s that downer. Your husband is so lucky to own custom made luxurious shirts, made by your loving hands!!
Maybe I’ll make a feminine version for myself.
LikeLike
I’ve never picked up a men’s shirt pattern – perhaps I should. I like the look of that side seam with the gusset. Sometimes I think men just get better designed clothes – clothes are are meant to be worn and not wear out. By the way I do flat-felled seams on shirts all the time – I just like the way it looks, inside and out. It explains why I’m such so slow – I just love all these types of detail.
LikeLiked by 1 person
Thanks for your comment! Yeah, men’s garments in general are designed to last and make alterations easier — so they’ll last even longer. Did you note the back waist seam in a pair of men’s pants? It makes altering for the waist so much easier. I wonder why women’s pants do not have that detail? Well, we sew so we ought to incorporate it ourselves.
LikeLiked by 1 person
The waist back seam makes so much sense, I agree!
LikeLike
I keep meaning to add those details to my personal sewing, but I get so speed-oriented, I just forget and sail on past. That’s my 2020 resolution: take time on one thing.
I was having the same set of thoughts regarding your trouble with this fusible interfacing as I have about fusible thread: it’s not permanent. So all the time I’m reading the Threads article this evening, I keep making enough derogatory noises and snorts that Spouse comes in from the other room to tell me to stop.
It’s fusible interfacing just long enough to get it sewn in. Fusible facing will not stay put. Fusible thread only fuses to the inside of the bobbin case and the iron when I forgot about it. It seems like such a great idea, but I can’t see it through.
When in doubt, wonder tape.
Wishing your fingers speedy healing.
Stephanie
LikeLiked by 1 person
Thanks for the speedy-thumb-recovery wish, Stephanie! Your wish is being granted — I believe it is scabbing. I still have to watch out for accidental bumps against furniture and such (things we don’t even think about normally). I still can’t hand sew, though. If I’m careful, I can put the thumb through the scissor handle and cut fabric, but can’t push a needle. Oh well….
Keep us posted about your 2020 resolution 🙂 .
LikeLike