In my opinion, the best outcome occurs when you work backwards from the final envisioned project. Which is to say, do as I say and not as I did with this lovely tank-style maxi. Yeah, I’m visiting it again to articulate some seemingly small procedural things, but when purposefully thought through before even cutting out, are really helpful for a good outcome.
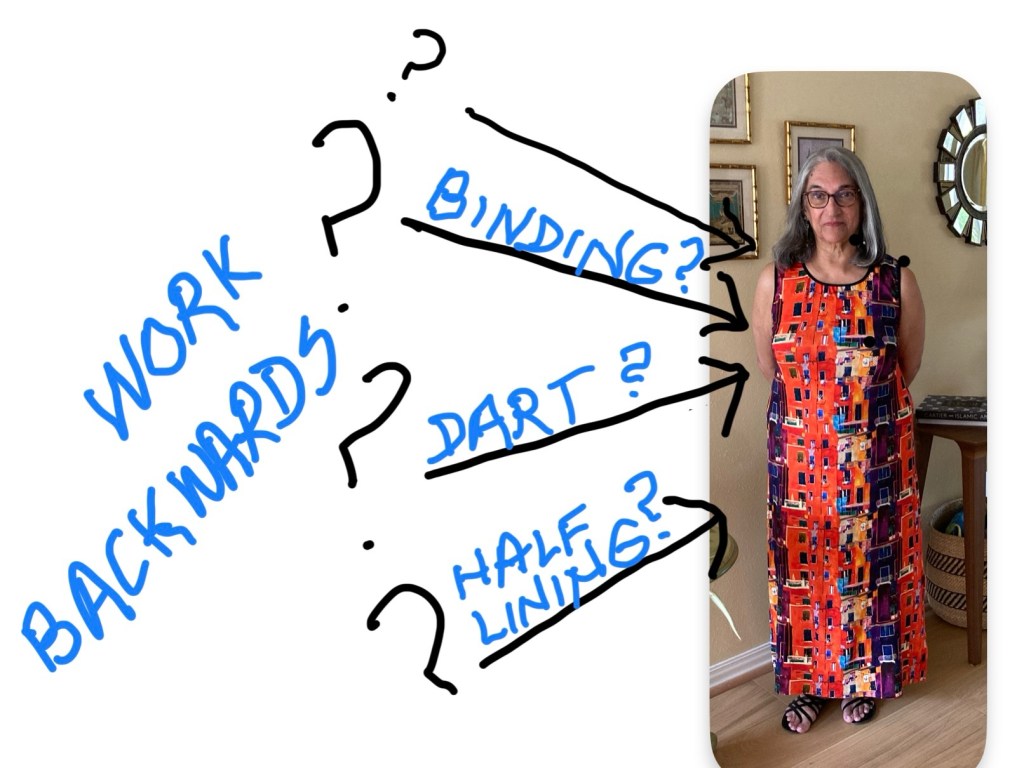
My focus in this post is on the dynamics between three things: the lining, the armhole-and-neckline edges and fold-over elastic. Sounds so straightforward, no? But read on…
What I did:
I basted the lining shell and dress shell together at the armholes and at the neckline with a very narrow seam. The wrong sides of both shells faced each other so there are no lining seams touching me (stay with me here). So far, we’re good.
I cut the foldover elastic (1 inch wide) to the appropriate length, 1/6th smaller than the circumference of the neck and 2 pieces for the armhole edges, plus 1/2” to overlap; (the 1/6th is not a hard and fast rule because it varies with each source of information).
How was I going to overlap the binding? This ended up being a conundrum as I went on sewing.
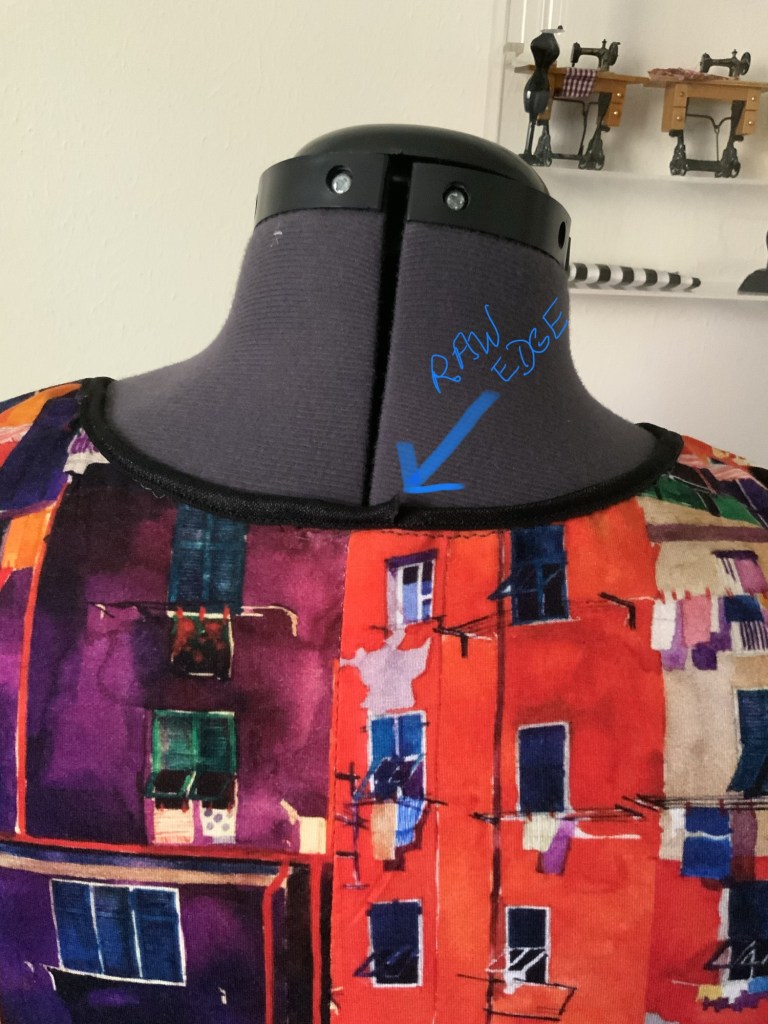
A) Folding the elastic edge inwards at the overlap point was bulky. So I left a raw edge at the overlap which was not a good idea either since the elastic does ravel; but this is what I ended up at the neck binding overlap anyway.
I thought I would try a different approach on the armholes — undo the seams of the dress and the lining for a couple of inches under the armhole (bad-language-inducing task), then applying the fold-over elastic to the ripped out side seams from one end to the other, then sew the side seams together to close it up. Now it looks weird, because the side seams below the opened out area are facing inward while the 2 inches of the underarm seam is facing outward. Awkward!!

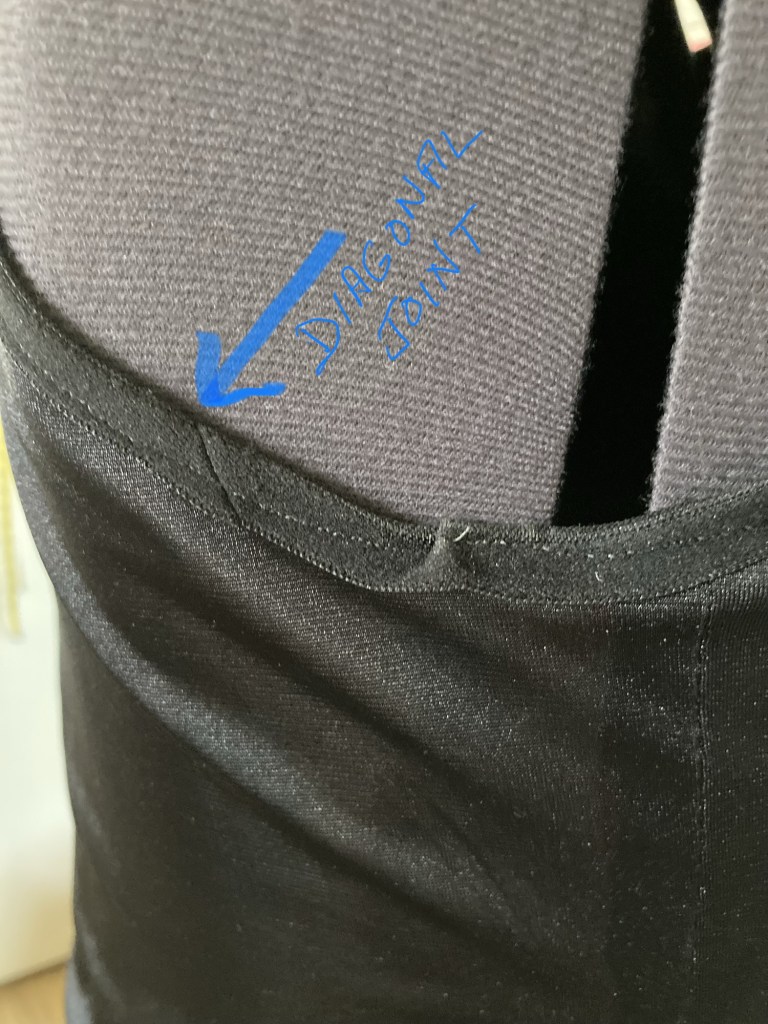
A third option was applied to the other armhole at the overlap; the ends of the foldover elastic were joined with a diagonal seam before sewing it down. Better but not utterly satisfying.
Well, nothing will show as I’m wearing it, but there you have it. One more thing: the 1 inch foldover elastic was just not wide enough to properly enclose the basted edges of two layers. Are you still with me?
What I should have done:
Should have used a wider knit binding — I had plenty of black knit stashed fabric — and applied it with two seam passes (sew it on, fold it over and stitch in the ditch). Foldover elastic uses just one pass and it is great on just one layer of a lightweight knit garment. I know, I’ve done it; see my old tunic below. I’m sure there are wider foldover elastics available but I’m working with what I have.


Secondly, I should have left the side seams and the back seam open (yes, this dress has a shapely back seam, and no it does not take away from the print); then should have applied the binding from one open edge to the other, then sewn the dress/lining vertical seams together. The seams would be visible on the wrong side of my dress and touching my body — that’s fine. It’s a study in picking one’s battles.

Do you see what I mean that some pre-thinking is necessary for a better outcome? Coulda, shoulda…. Or, is this all drivel to you?
Much love to all my readers. Keep thinking about nice clothes, keep nerding out on sewing techniques, keep sewing and keep being nice.
Samina

I probably would have sewn the main and lining fabrics RST, neckline first, then burrito rolled for the armscyes, and avoided using binding altogether. But hindsight is 20/20 right? I always look at stuff like this as “Well, I learned something!” 😉
LikeLike
Thanks for the idea, and for reading my post. My vision was to outline the print in solid black. When I make the same dress in a solid color (maybe black knit?) I’ll remember your suggestion.
LikeLike
Thank you for sharing, because something new is a part of everyday learning. Someone, somewhere needs this blessing. Keep up with your creativity.
Blessings always,
Mtetar at Basic Is Simple
LikeLiked by 1 person
Thank you for reading my words 🙂
Makes it worth it.
LikeLike
You’re welcome and it is worth it. Be blessed and a blessing, Mtetar at Basicissimple
LikeLiked by 1 person