
Perk up! I’m excited to show you the completed jean-jacket — still technically a trial. Yay. I really like it! Roz was right in saying that it is a “completer” piece. Wanna hear something funny? Even in its incomplete state, I wore it out the door, albeit just to take a few steps to the mailbox.

Also, I have a couple of sewing and finishing tips for you, which I used while completing the BJJ 🙂 . Now we can have some fun styling it, can’t we?
Thread Knotting
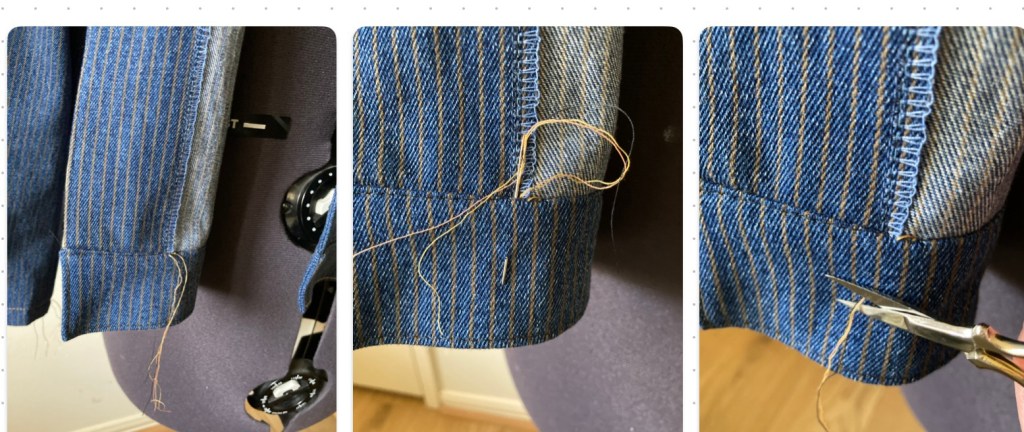
1. Knotting up the topstitching thread by first pulling the loose bits to the wrong side is best, as we all know. The key to an almost invisible finish is to make a smallish knot, thread the hanging bits through a tapestry needle (or any needle with a large eye), and run it through between fabric layers and out again. Tug gently and the knot will move inside too. Now, the knot becomes invisible and no one can tell where the stitching ended. This is an haute couture method but why can’t it be used for the rough and tumble jeans-jacket?
Fray Checking
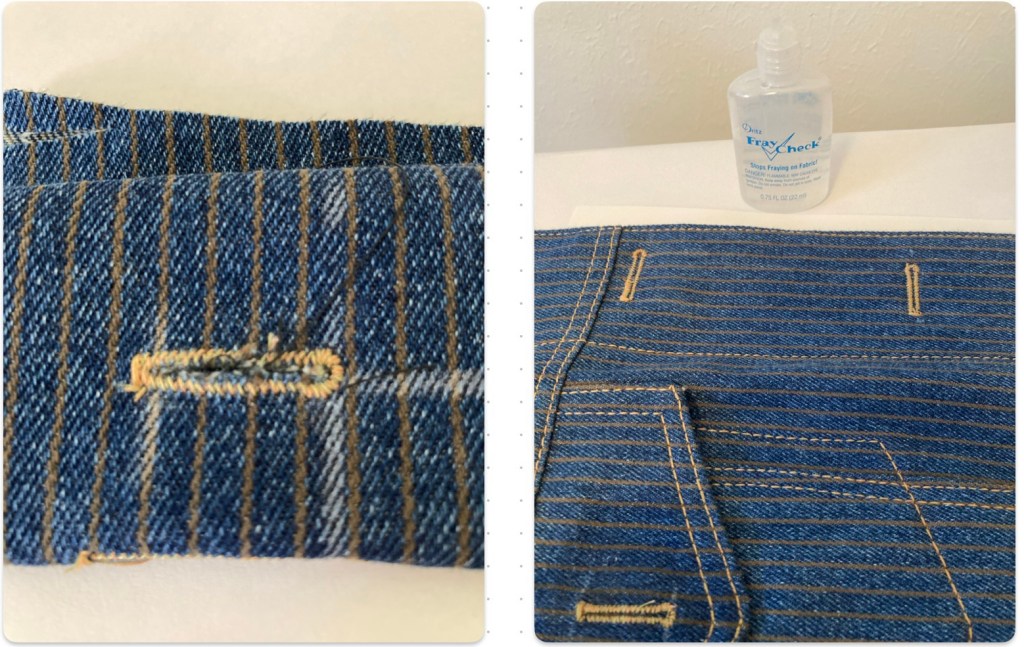
2. I am always mindful of the difference between using and not using Fray-Check before cutting open buttonholes. In the image below, un-FrayChecked buttonhole and a properly Fray-Checked one.
Skipping Pocket Flaps. What?!? NO.

3. Conventional wisdom makes a good point when directing well-endowed women like me to skip the pocket flaps on a jean-jacket — or at least make them unobtrusive. But I chose to ignore that bit and did the required top-stitching and buttoning the flaps. The pocket detail is what makes a jean-jacket a jean-jacket.
Diving in the Button Stash
4. I have a good enough button stash but no typical jean buttons to use in my BJJ; these flowery metal buttons were the only metals in a suitable size for the jacket. The point in making this trial jacket was to use up the stash.
Topstitching Armhole

5. For topstitching the sleeve/armhole seam after it’s been completed, I made it real easy by removing the machine’s “flat-bed” extension, which enabled me to sew in the round very easily. The picture explains it all. Most machines these days have a removable extension.
Moving forward, I plan to wear my (trial) BJJ this spring. I’m ready to make another one after I get some newly ordered denim in my hands. About the wardrobe building group effort that started it all, I wonder what piece Roz will suggest next?
Stay calm and sew on.
Samina

Morning Samina! I love your jacket! Congratulations on finishing it already – I’m eager to start on mine. I really like the buttons; something fun and unusual, but still quite within the expected metal buttons as you mentioned.
And thanks for the tip about Fray Check – I didn’t know! It is the one thing I hate as a home sewer – my homemade looking button holes. On important projects, I had been going over them again with hand-stitching to cover up the fuzzies, but I’m eager to try out your tip on my next buttonhole project!
LikeLiked by 1 person
Thank you, Kasey! My Jean-jacket is already being road tested — pretty soon the hot weather will descend on us, and it will probably rest up in the closet.
I am so ready to make another one 🙂
LikeLike
WHAT — no selfie showing how you look in your new jacket?!
In theory, ie, on its mannequin, it looks fantastic! Love the non-traditional flower buttons.
Thank you for several good tips, as well, Samina.
LikeLiked by 1 person
Selfies coming soon. Although the jacket has made its public debut.
LikeLike
Thanks for posting your progress!! Love the outcome. 🙂
LikeLike
Thanks, Roz! You’ll see it soon…
LikeLike
that “test jacket” looks too good to just be a trial. Glad you will be wearing this spring. I love the buttons too!
LikeLike