Hi all! Happy National Sewing Month! Well here’s the answer to last week’s puzzle. The persons with the best answer (see last week’s comment section) are steelyseamstress and erniek3. Good guess! You now have bragging rights!
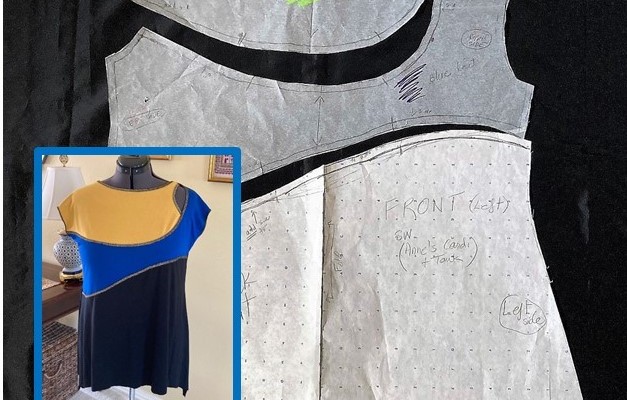
Here are the pattern pieces, the right way up (they were turned around and jumbled up last week to mess with you.)

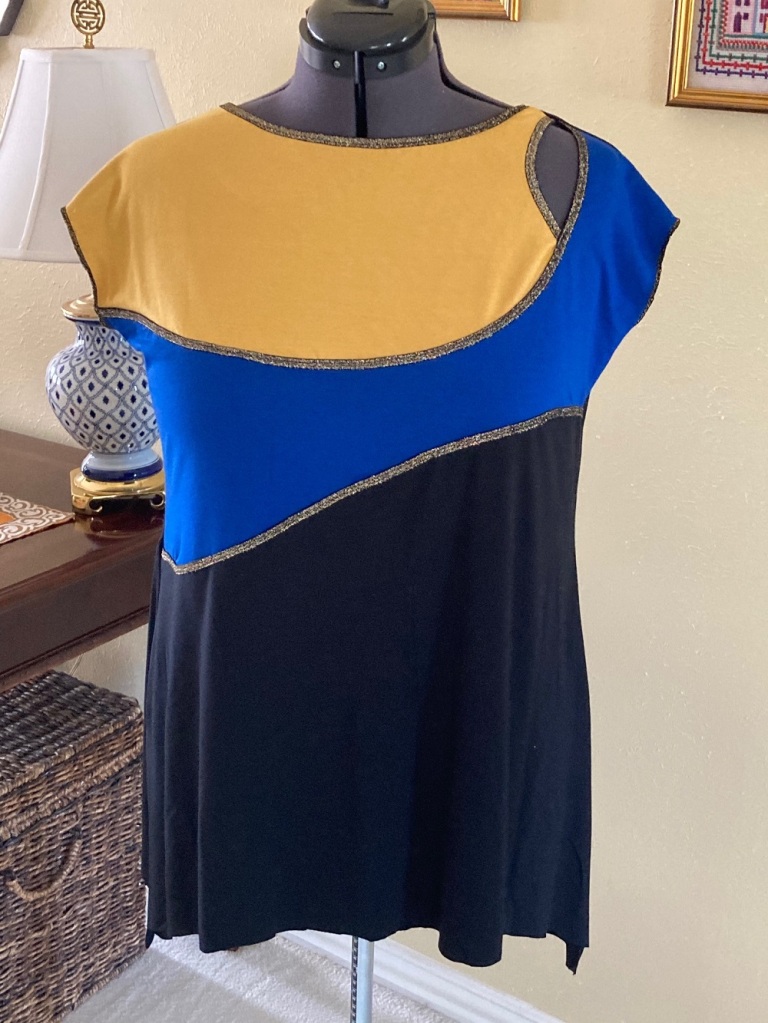
For some background: The top consists of leftover pieces and scraps from other projects made with Sew Much Fabric‘s 11 oz. rayon knit; it is part of a “challenge” created by members of the sewing fashionista group and Roz of Sew Much Fabric — and Marfy Patterns is in the mix. The rules are not stringent, provided you do not care about winning prizes and just want to be creative in a stress-free kind of way. I’m taking the stress free path. The name of the challenge is #MarfyRemnantChallenge and you can search it on Instagram for rules and info posted on Anne’s grid — @youtiquebridal. Or look up two other grids: @sewmuchfabric (Roz) and @sewtofit (Andrea)

It was a journey of sorts. Using myriad fabrics, only three in my case, does require some attention; because the three pieces had to land in the right place for the right effect. I decided to use scraps of 11 oz. rayon jersey in the scrap-stash. First, some doodling.

Then, inspiration pictures from a 2015 Dior runway which were hanging out at the back of my brain.

This had to be an easy to wear top, using an old Sewing Workshop pattern, Ann’s Cardigan and Tank.
Next, I actually did some “fashion” sketches, with help from a Threads magazine article authored by Yelen Aye to refresh the illustration skills I had lost to time. See how I used the curvy panels and the neckline cut out on the side? In addition, I gave it a cap sleeve effect by extending the shoulder seam.

After tracing a copy of the pattern (this tank pattern is quite a workhorse so I refrained from cutting up the original), I drew some curved lines on the front to mimic my vision (and Dior’s); this is when you must make sure no line ends up where you don’t want it. I also extended the armhole at the shoulder line and blended it with the underarm point to give it a cap-sleeve look.
Then comes cutting apart the pattern, then tracing each one again — what? Too much work!! Well, the second tracing is where you will add the seam allowances to the newly designed curved edges, so do it!!
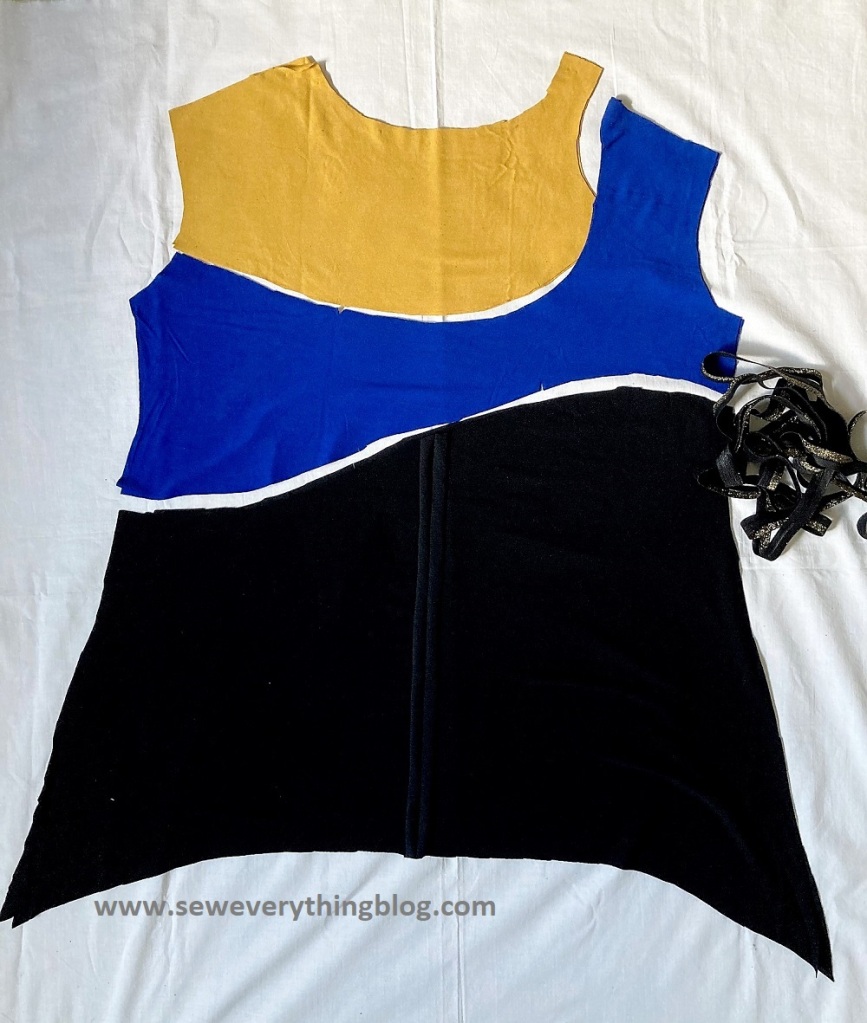
Now we’re all set to cut the fabric. Each piece in this top is doubled up with the same rayon knit, and sewn as one — because I like the additional weight and smoothness added to the garment. FYI: the back of the top is solid without piecing, and also doubled with self fabric. I must add that I had to cut some stashed unused rayon jersey for the back due to the black scraps not being large enough.

Instead of sewing the front curved seams together in the usual way, I did a stash dive and surfaced with a black gold-flecked elastic foldover braid and enclosed the following edges: upper curved edge of the black knit (bottom portion), upper curved edge of the blue knit all the way to through the curve of the neckline up to the shoulder (middle portion), neckline of the yellow knit plus the curved cut-out; finally, the back neckline. Important note: cut away the seam allowances from the edges which will be enclosed by the foldover gold elastic. So why did I add the seam allowances to those pattern edges and make more work for myself? At that point, the foldover elastic idea had not surfaced.
An overlapped seam is used to sew the pieces together. The braided edge is overlapped on top of the edge above it, using a narrow zig-zag.
The sleeves, I decided, were going to be serge-finished with a gold-flecked decorative thread in the upper looper; the thread was a stash discovery and totally co-ordinates with the elastic foldover braid. The advantages of a deep stash dive are many.
The hem will be serge-finished with the gold-flecked serger thread; sorry, it’s not done for this post. At some point, I will post a picture of myself in this top. Until then, hope you decide to dig out your scraps and see what you can do with them.
Samina

OMG LOVE!!!!!
LikeLike
Glad you like it, Roz!
LikeLike
Good Morning Samina! Your top is marvelous; you really are so creative! I think it’s wonderful how you came up with it. And I like hearing about all of your different stashes – The Stash, The Deep Stash, The Scrap Stash – I need multiple stashes…. I’m glad to see your decorative use of your serger too, I hope it encourages others to do the same. Have a great week!
LikeLike
Thanks, Kasey! I really lucked out on finding that decorative serger thread. I think it’s time we categorize the stashes…. just “sewing stash” or “fabric stash” won’t do any longer. 🙂
LikeLike
Samina, what a beautiful top! You’ve once again shown your creative genius by designing and sewing such a great addition to your wardrobe.
Thank you for sharing the ideas, from concept to completion, so that we may take what we’ve learned here and move forward with the information you’ve shared here.
Love, love, LOVE this top!
LikeLike
Awww. Thank you, Annie! As soon as I finish the hem, I’ll wear it — it’s such a feeling of freedom when you add to the self-made wardrobe.
LikeLike
Really elegant and fun top, Samina!
I often make choices in my own sewing that I regret, and for your Puzzlement top, my instinct would be to use the foldover elastic for the sleeve hems. Can you please explain your thinking on going with the decorative serger?
LikeLike
Thanks, Joan! There needed to be a distinct line between the curved pieces, and a foldover seemed like a good idea to clearly define the lines. I did not use it one the sleeve hems because this particular elastic is a little beefier than the usual foldover elastic. Adding to the sleeve hem might have made the hem stiffer rather than a softly falling extended sleeve. I had just enough elastic for the sleeves, but not enough left over for the lower hems — so those things made my decision easier. We work with what we have, right?
LikeLike
Samina, that is hands down beautiful.
LikeLike
Thanks for explaining your thought process, Samina: very helpful. The elastic could have made the sleeve overly “perky” and structured.
p.s. I loved your sketches, too: very helpful in working out color combo and exact design.
LikeLike