
Coin purse, vintage style clutch or whatever you want to name it, this is what I made recently – and I love this quick-to-make project!! Since this is the first one in my vintage-coin-purse sewing repertoire I have some thoughts…..

Why have I not done this before?
Okay, seriously, let’s begin at the beginning. I had a difficult time searching online for this style of metal frame.

All others frames involved gluing the bag into the frame — a potentially messy proposition. I wholly admire craftsmen and craftswomen who can use glue without a drop going astray. So the purse frame had to be the sew-in kind. I found this antique brass-finish frame on Etsy and here is the store link (no affiliation): Bits and Purses. The frame is smaller than I wanted but it had the preferred shape and finish; also, there was a very limited supply so I snapped it up, along with instructions and pattern for an additional cost.

The pattern outline had to be adjusted to the frame as printed in the general instructions. See image above. I purchased the pattern just to see how this kind of purse is made.
Let’s address the frame’s sewing holes: not until I started to make this little coin purse, did I notice that the holes are on one side of the frame only!

Heck, that means the needle cannot come straight through to the back; the only way to get around that was to wiggle the needle direction so that it came through the fabric under the wrong side of the frame (one without the holes). Lesson: look carefully at a sew-in frame before buying. Anyhow, I managed to stitched the purse edges in – you can see the wrong side in the image above. Disclaimer: this detail is noted in the seller’s page and it is totally my fault for not reading it thoroughly.
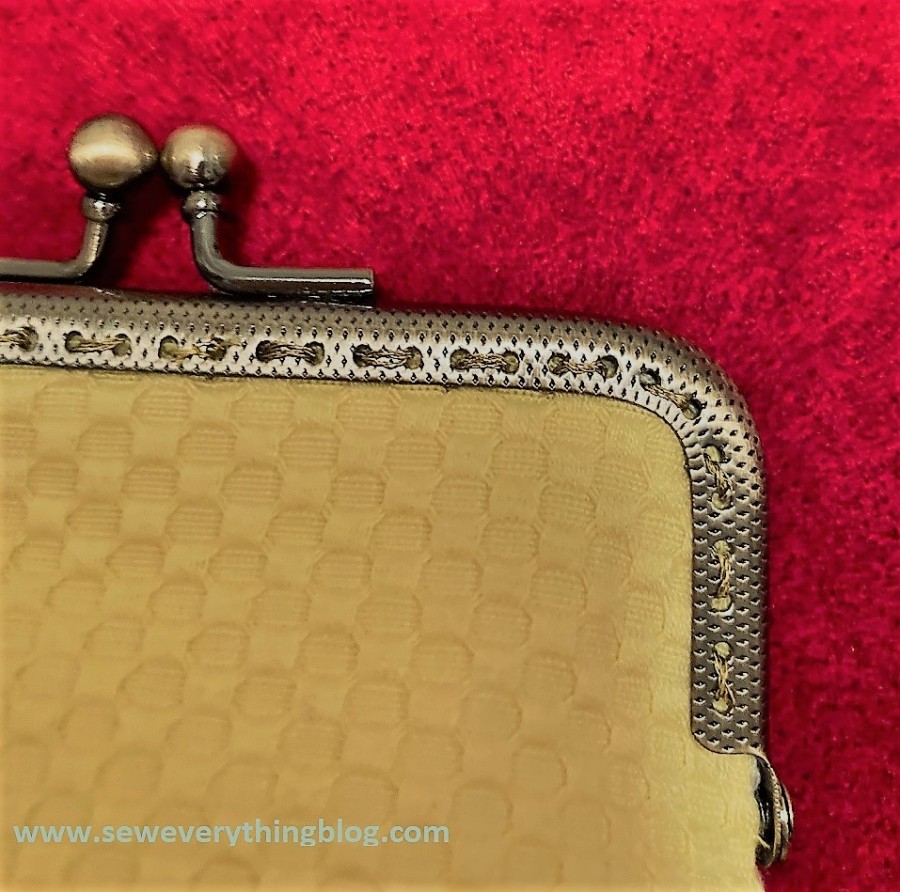
To attach the frame, I used metallic embroidery floss – because it looked so cool with the frame! Next time I will use a cotton floss or pearl cotton, or some other thread with a smooth surface. The metallic floss, the brass finish, combined with the weird angle of my hand needle (remember, no holes in the back of the frame) managed to fray the metallic floss! Good thing this was a small purse and there was a short distance to cover. The importance of careful selection of the frame is self-evident.
Why did I use a ho-hum white linen for the other side of the purse? Heh, that’s a secret I will reveal later. Can you guess?

Be healthy and be safe! I’ll see you in the next post which may or may not reveal the secret that concerns this little purse.
Samina

Adorable! As for guessing the secret: I am guessing there is, as usual, a method to your madness…!
LikeLike
You know me well. If I get to write a book, it could be titled “The Mad Seamstress” 😀
LikeLiked by 1 person
A cliffhanger! I have no idea what your secret is. You’re going to embroider it? But you would do that first. I’ve thought about making a cute little change purse like that, but it seems like fiddly sewing, or maybe it’s the frame that’s the fiddly part.
LikeLike
Yep, and I’m working on the reveal — which I hope you will find worth the wait! No, not embroidering it, although that’s an idea for the next purse I make. Attaching the frame was fiddly, but only because I did not buy one with holes on both sides. As I say in the post, I had to wiggle the hand needle a bit. Otherwise, it’s a quick project.
LikeLike
First of all, Mum, this is beautiful… reminds me so much of the change purses my grandmother used. Secondly, if this was as easy as you say – I’ll be putting in a request for camera lens pouches which look like basically the same setup. Won’t even require the metal thingy on top!
Very cool post!
LikeLiked by 1 person
Done and done. We’ll talk about it.
LikeLike
So nothing (dye) will rub on your clothing??
LikeLike
No. Coming soon …. hope it won’t be a let down after after I whet everyone’s curiosity. 🙂
LikeLike