
After 3 Craftsy classes, numerous YouTube videos about installing a fly front zipper, a surprise win of the only knit jeans pattern (that I know of), and a few sewing hours, I am the proud owner of boot-cut, knit jeans.

This pair is the ultimate in comfort jeans. The knit fabric upgrades this pair for the style-plus-comfort seekers. Jeans are nothing if not snug-but-comfy, and good looking at the same time. This is how it went:

The pattern: I won it! Jennifer Stern Haseman emailed me that I was a co-winner of her Ponte Knit Jeans pattern, along with another lucky lady! The pattern is availlable in Misses and Womens sizes. A Misses 16 matched my size so I traced that. The guide sheet pages have body size and finished garment charts, including helpful front-rise and back-rise info. I made this pattern exactly according to the pattern designer’s instructions. All following versions will suffer my tweaks.
Alterations: I reduced a LOT of length. My friends, you know that I’m under 5’4”, right? The pattern is marked with a knee point and it’s imperative that your knee matches this very point. That’s the way jean making goes. I reduced the length above and below the knee point, as well as at the hem. I made a width adjustment at the side seams after they were sewn. The jeans were not snug enough so I took them in at the sides starting 2-3″ below the waist. Much better, but the coin pocket moved closer to the side. The pattern guide makes it clear that for a snug fit, one should choose the size smaller than the one that matches your body measurement.
Fabric: Purchased from Sew Much Fabric – there is a lovely, curated selection of fabric here. Since textile manufacturers have not created a denim look ponte knit, I decided to go with black, risking blindness at the end of the project. I think my eye glass prescription changed a little with this project.

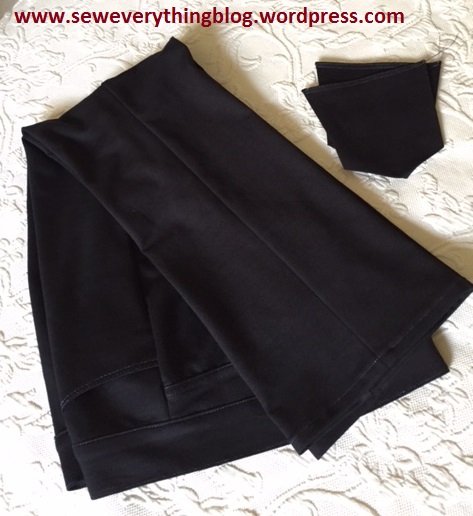
Top of the jeans: this area is what makes jeans, er, jean-like. It includes a cotton pocket lining which extends across the inside front, forming a stay. It keeps your abdomen area “together” (mine is beyond keeping together), and forms a smooth line at the top. Oh, and there’s an optional coin pocket. Everything in this area is top stitched, including the crotch seam.


Fly zipper: My last fly zipper installation was decades ago, and silly me, I thought I would remember exactly how its done. Haha. But – nothing is difficult if you know how. I read pattern instructions repeatedly, watched numerous videos and concluded that each expert has his/her own fly zipper method. So I followed Jennifer’s instructions. Even made a sample. Except, on the main piece I forgot to cut off the extra one inch of the zipper at the bottom and now it’s caught in the top stitching on the side. I left it there since it’s not changing anything. It’s laying smoothly in.

Top stitching: What’s a pair of jeans without top stitching? After an hour of deliberation, I was left with two thread choices for top stitching; black and a mottled denim-like blue. Black top stitching thread started to majorly strain my eyes, so I went with the denim-y thread for top stitching. It was visible without being too much of a contrast. I’ll save the yellow/orange top stitching for denim jeans. On the other hand, I always wear longer tunic length tops these days so all that effort is going to be hidden anyway. The instructions do not specify top stitching on the sides or inseams; no mention of the hem in the instructions. So – I did not top stitch the side seams or the inseam, and made a top stitched hem.
Back pockets & belt loops: Back pockets with fancy top stitching or embellishment are de riguer in jeans. But, I decided to eliminate them because no human will see them anyway, under my longer tops. Maybe the next pair will get them. Belt loops did not get in because I do not use belts.
Sewing: The instructions do not specify any particular stitch to use with the knit so I just went with the straight stitch extended to 3.5, and stretched the fabric slightly as I sewed.
Things I will do differently next time: Select a non-black fabric, reconsider back pockets, top stitch the side seams, trace a size 14 pattern, and narrow the leg. Oh, and I’ll use a stretch stitch for stronger seams. Also, I’ll select a cotton lining fabric that matches the fashion fabric color (to prevent the contrast accidentally peeking through at the zipper area); I’ll add a small wedge at center back of the waistband to give it some curve and hugging properties.

Conclusion: They look just like black knit pants until you look closely. I love this first pair, and see a few more in my future. Thank you, Jennifer Stern Haseman!
Hope you give jean making a try! It’s so empowering…..
Samina

You did a great job sewing those! They look really comfy too.
LikeLiked by 1 person
Thank you! They are very comfy – feel like pajamas!
LikeLiked by 1 person
So happy for you and so very impressed. But I don’t like saying impressed because that might imply that I am surprised and I am not. I already know that you are the best.
LikeLiked by 1 person
Awww. Thank you! Go ahead and use the word – “impressed”. The connotation will still make me happy. Thanks for your faith in my sewing abilities, dear friend!
LikeLike
Those look great. How nice to have a pair of stretch jeans fit perfectly from the beginning and so comfy
LikeLiked by 1 person
Thanks, Marilyn! Yes, its so empowering when something fits you without any major tweaks. I’ll have to try and make denim jeans and see how much I have to tweak those.
LikeLike
These are very nice. I have her jeans pattern and upon taking her “in-person” class, was told they would fit my rump with out extensive alterations. So, of course I decided not to bother with them at all. Yours look great.
LikeLiked by 1 person
O Andrea, go ahead and bother with them. You’ll like them :).
LikeLiked by 1 person
How nice to make a pair of pants that fit from the get-go! Hooray for you!
I make a lot of jeans; it’s the most flattering pant style for me at this point. I drafted mine off a pair I adore, and haven’t looked back.
Since I don’t use back pockets, I don’t add them. The question of ‘where’ and ‘how big’ outweighs the ‘beautiful topstitching’ potential. The really gaudy ones disturb me (True Religion?) but that could be a lot of fun. Bedazzlers everyone!
LikeLike
I agree with all your reasons for eliminating the back pockets. If I was trim enough to display my back shape, I would totally add the pockets. As I am now — why bother?
You make a lot of jeans? Yo have my total admiration. My next step is to try real jeans – I mean denim ones. Thank you for leaving your thoughts here :).
LikeLike
Very informative & a fun read as well. Thanks.
LikeLiked by 1 person
You’re welcome! Sewing should be fun…..
LikeLike
Be sure to check out Jennifer’s jean pattern – I’ve made many versions from her jeans pattern and have been always pleased with how they turn out. After seeing your version, I’m hot to try a knit version
LikeLiked by 1 person
Hi Lynn! You’ve made many jeans? I’m your fan forever!
LikeLike
What a great job Samina. I just love Jennifer’s patterns and you have inspired me to try this pattern. Appreciate your thoughts and suggestions.
LikeLike
Oh, please try them. Share after you’re done. The funny thing is, the finished garment seems so heavy when you hold it up, but once it’s on you, it feels very light – I guess that’s the beauty of knits.
LikeLike
Oh, Samina, you never fail to impress me with your talent! And, the fact that you share such honest information and insights is just such a benefit to the rest of us out here in the sewing world.
The knit jeans look just wonderful on you.
Thank you for sharing!
LikeLiked by 1 person
Awww, Annie! Thank you for the wonderful words – they keep me on the right path (sewing path).
LikeLike
What a great pair of jeans! And thanks for all the tips – I can really “see” where a strong cotton woven for the lining would have been the better choice, and am grateful to have my decision to stick with a stretch stitch for strength confirmed. Beautiful work as always. ❤
LikeLike
Thanks for the comment, Meg! I did use a cotton as the instructions call for, except I used a contrast color. I’ll choose a color closer to the jeans next time to avoid peeks.
LikeLike
Knit jeans would be so comfortable. You did a great job with them. Nice work on the topstitching! I love topstitching – most fun part when I was making mine.
LikeLike
Hi Linda! I love top stitching too. On clothing other than jeans, the topstitching gives such a clean sporty look. Thanks for the compliment!
LikeLiked by 1 person
These are fabulous! I love the contrast topstitching, the front pockets, and a real fly – oh my. A sewing achievement and very flattering on you!
LikeLiked by 1 person
Thank you, Lisa! I would recommend that you try making a pair of jeans.
LikeLike