I threw caution to the wind and used a star resident in my fabric stash – a peach silk georgette with a meadow print. Then, I wanted a “tacked” seam to be the breakout co-star: it became an “also-starred” but still very cool. After much obsession since the detail was shown at the Spring/Summer 2016 New York Fashion Week, I was ready to tackle it in a beginning rudimentary fashion.


Definition: the edges of garment pieces are joined by first finishing each edge, and then abutting them by one of two (or more) methods, at equi-distant intervals. The only place on this tunic I could use the detail were the shoulder seams. It is more pronounced with horizontal seams.
This seam detail has more than one face: Below are three variations, but within these parameters, there is so much room for even more creativity!


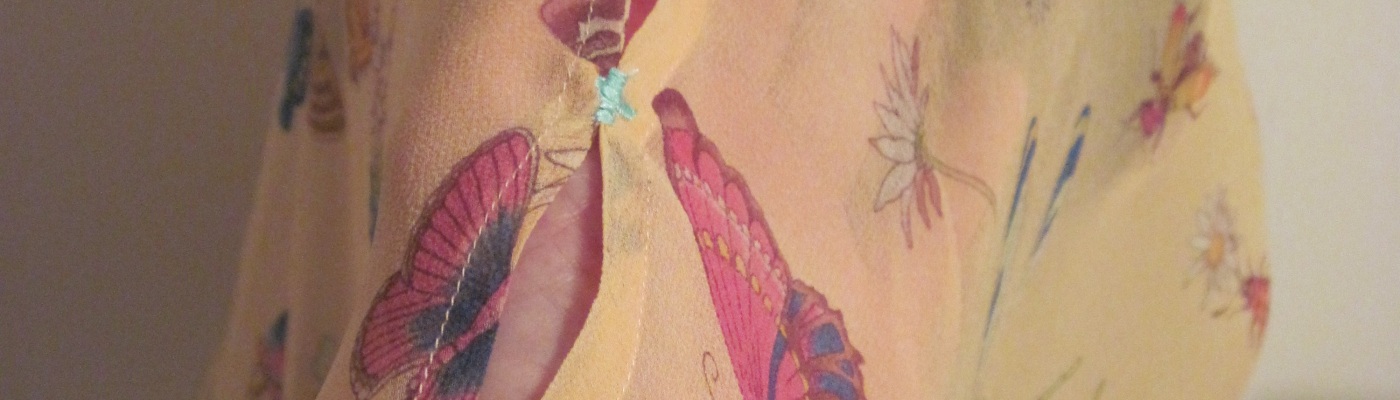
Tacked: where the two edges of the garment seam are butted together at intervals by a thread tack at intervals. There are many, many things you can substitute for the thread tack. For my georgette top, I use a small satin stitched “bar” (which became a cross later (addressed this below). For owners of embroidery machines, a tiny (or large) embroidered motif can be used at that tacking spot. How about a set of small decorative buttons or beads?

Bead filled: I first came across designer Andra Gabrielle in Vogue magazine (fashion, not the pattern mag) and in Threads! That is where I came across the seam detail where the two edges were joined by a string of beads, and I’ve been enthralled all these years. Here, the edges are further apart than the tacked version (joined together at the point of the tack).
Looped & threaded: This is Zac Posen’s “hanging” seam. It seems like a variation of the faggoted seam of the heirloom sewing genre. The edges are further apart and the resulting space is filled with corded loops. It takes a little more effort, but so worth it. To analyze it, the longest step would be to make the tubing; however, for a quick trial one could use tubing sold by the yard at a sewing store. Then comes the fiddly part (don’t want to say difficult part) – the arranging of the tubes in the seams. Another version of the looped & threaded detail includes the loop as extensions of the seam; that would be fiddlier than ever. I’m determined to knock off Mr. Posen on this seam style, for whom I have this advice: please license your designs with a pattern company so us peasants can sew and wear a Zac Posen original.
Images below courtesy of Vogue.com and @Zac_Posen (Instagram)


Further Notes:
- For the purpose of this project, the pattern’s (McCall’s 6510) semi-circular shape got squared off, and the neckline moved up higher. As it turned out, I prefer a straight edge on the sides and hem of this pattern. The joining seams are at the shoulder and at the sides. The side seams are really lines of stitching following your torso.


- The shoulder seams run down the arm, and are a perfect venue for a hanging/tacked seam treatment. It is best when used on a straight seam, at least for the first few times. Then, of course, in the near future we’re going to try it on a curved seam.


- Pre-determine the distance between the tacks on the tacked seam version – or any other version. Here is where some pre-thought and trial is necessary. My trial of making the satin stitch perpendicular to the seams had a hidden danger point. One tug and the stitches pulled away on my sample. This occurred after I did both shoulder seams. What happened next was a sew-over on the first satin-stitched tacks in the opposite direction. So, I have a sort of satin-stitched cross at each point. It’s a bit wonky but I’m still mulling over whether to cover the wonkiness with beads. What do you think?

- Use tissue paper underneath each tack point.

- Best tip for sewing sheer fabric: spray starch – and it works! I got this tip on social media and think Susan Khalje is to be credited for it.

- I love a surprise color added to any project. Here, I used a soft turquoise china silk for the neck binding, and turquoise rayon thread for the tacks. There was no turquoise in the fabric, but it somehow worked; I think it’s because the intensity of the turquoise matches the hue level of the peach georgette.
Next step: making a peach camisole to wear underneath. My cream cami doesn’t quite cut it. It’s annoying when something else needs to be sewn up to complete an outfit. But I’ll get there.
Meanwhile, I love this tunic much more than the previous version. Be assured, I’ll be sewing up more versions of the hanging/tacked seam! And moving towards a spring 2016 wardrobe. And, just for fun, an outfit from the 1920s; sorry, I forgot who to give credit to for the image. I know it’s part of a museum.

Samina

Oh, Samina, I love that detail also but I think it is a little lost on the shoulder seam. Perhaps across your boobs………? Another thought. I like the perpendicular tacks, what if you did a few hand stitches that were perpendicular and then tacked over them?? The machine tacking would wrap around the hand stitches. I think.
LikeLiked by 1 person
Good tacking idea. Also, a horizontal seam anywhere on the garment, would be a lot more prominent than a vertical one. That’s why mine is getting lost since it hangs vertically.
LikeLike
So pretty! Very clever tacking the seams together! Copying designer fashion like that looks to me like a candidate for DESIGNIN’ DECEMBER!
LikeLiked by 1 person
Thank you! Go for it in Designin’ December. Share your make with us!
LikeLiked by 1 person
I absolutely love this, and my mind is already brimming with ideas for my own stash of sheer/semi-sheer treasures. I believe I have the pattern, and think I might just use this on a CB (and possibly CF) seam instead of the shoulders. Would be simple enough to incorporate, I think the lesser degree of stress on the seam would be an advantage, and the detail would be much more noticeable.
LikeLiked by 1 person
Thanks for the compliment, Meg! I’m thinking that a horizontal seam with tacks would “hang” more. But I’ve seen it on vertical seams too. Share your project with us when you’re done!
LikeLike
Beautiful! I like the change in shape, and also the placement of the tacked seam at the shoulder. I could also imagine a tacked seam at an upper chest yoke on a summer top, but I’d have to make sure to carry some safety pins in case of wardrobe malfunction,
LikeLiked by 1 person
Thank you, Lisa!
LikeLike