My Bias Binder Attachment was given quite a workout as written in this earlier post. Today’s post is about the tool and some tips to keep in mind. Bernina has a new version to go with their fabulous new machines. I don’t have either the new machines or the updated binder. But I made this……………. 
Read on, dear Reader, since the new binder basically works the same way with some snazzy design updates. If you’re thinking of purchasing it (its expensive), make sure you watch a live demonstration at a dealership, in addition to a Bernina YouTube video. The video, however demonstrates the binding tool designed for pre-folded bias tape. I personally prefer the one designed for flat bias tape.
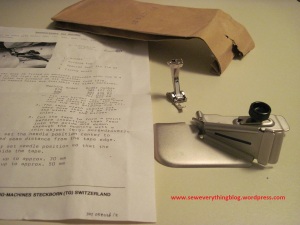
My Binding attachment has 2 parts: the weird L shaped guide (and you don’t know why it is shaped that way until you actually use it) which attaches to the machine with a pin and a screw. The other part is the presser foot #94 which looks like a one-legged creature and has to be used with the weird guide, #84. I don’t remember whether I had to pay separately for the #94 foot, or it came with the attachment. Charlene, feel free to chime in here, please ….
In this tool you insert a flat bias strip and at the other end the strip comes out attached to your fashion fabric as a perfectly bound edge. Magic! Now the tips:
1. Cutting the bias strip: the width of the strip should be the exact size of the opening. My tool has a 1” opening. Even a smidge small and you will end up with raw edges showing instead of a nicely folded edge at the other end.
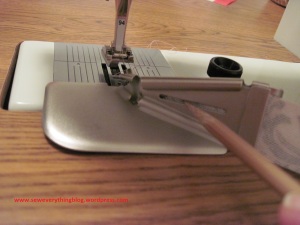
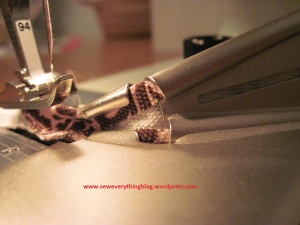
2. Inserting the bias strip in the tool: Cut the end of the bias strip into a point. Insert into the guide – that triangular part of the L shape. You’ll need to use a sharp pointed thing (I use my bamboo awl) to guide and push it gently into and out the guide, under the needle for about 2 inches or more. You’ll now see the point where the flat bias edges will be turned under. The binding tool folds the under-edge a little wider to enable stitches in catching the fabric underneath (which you cannot see). That is slick……. See the picture below tip #4.
3. If binding a quilted project, it helps to sew a line of stitching around the edge to be bound, about 1/8″ away from the raw edge.
4. Important: move the needle position to one of the left positions. I move it to the far left so the stitching ends up at the very edge of the binding. Risky, but if I sew slowly and carefully, the results are good.
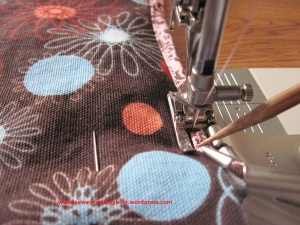
5. Sew a few stitches to start the binding without the main fabric. Then place the main fabric at the center of the presser foot (#94) to start binding.
6. Keep your eye on the needle! This is one time I am taking back my insistence that one should not watch the needle while sewing.
7. Whoa, slow down. When you see the binding form and attach itself to the fabric magically, there’s temptation to hit the pedal. Don’t do it.
8. In addition to watching the needle, use the awl in front of the needle to make sure that the binding is not pulling out.
9. My old #84 works well on curved, outward corners, if you go slowly, move the main fabric properly, and use the awl to make sure everything is moving like it should. I have not tried concave/inward corners. A sharp corner is impossible to do, in spite of what the brochure said.

10. Need to piece the flat bias tape to complete the project? You can, but not with anything heavier than a thin cotton or a silk taffeta or fabric of similar weight. My home dec fabric in the picture is not heavy at all, but the joint seam did not go through the guide at the point where it gets folded. The joining seam in the pink silk taffeta tape sailed right through!
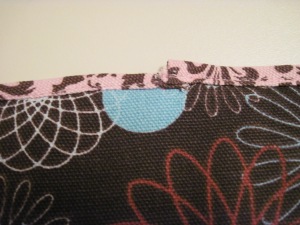
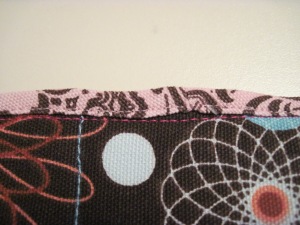
11. Joining the beginning and end of the tape if the binding is going all around: Stop sewing about 2” before the end, pull out the project through the binding tool and join it manually. It’s an easy step but I’m all thumbs with this. You can either seam the two ends together and then attach to the main fabric. Or, you can overlap one end over the other. 
These are the bias binding tool tips that I’ve learned. If you’ve used this tool, do you have any other tips to share? I’d love to hear from you. Or is there something you would like to know about this tool which I have not covered here?
Hope you enjoyed these tips!
Samina




Great tips and detailed instructions. I have a binding foot for my serger, can’t wait to try it.
LikeLike
Hi Tee, I’d love to know how it works out on a serger.
LikeLike
I have the new Bernina binding foot. Same thing, it only works well with light weight fabric.
LikeLike
Thanks for your comment! Have you used it a lot? Would love to see. With the high price tag one would think this tool should do pretty much —- everything.
LikeLike
I still have not purchased this tool, but this post will be very handy if I do!
LikeLike
Catja, whenever you do, see a live demo and take a selection of fabric with you.
LikeLike
I love my bias binder! I do use some light spray starch on the binding strip as I prep it to insert in the binder. I also press my joining seams open, which cuts down on the bulk at these seams. I have no problem at the end overlapping the binding but I do use a bit of glue to fold the final edge under before it goes through the binder. I tend to overlap about two inches. This foot is expensive, but once you get the hang of it, it is invaluable and saves a lot of time. I recommend the widest binder for quilting. Mine uses a 1-1/2″ strip.
LikeLike
Ooh, thanks for the tips, Ruth! When pressing the joining seams, I just followed the instructions on the Bernina brochure to press them to one side. But your method of opening the seams seems to work. I think the wider strips are easier to handle the smaller 1″ strip which results in a small 3/8″ binding.
LikeLike