Hi friends, thank you for visiting my blog!
In this post, I’ll try to convey the method I used to raise a cowl neckline on a pattern which was originally so low that wearing another layer underneath became imperative. That was not the look I was going for…. take a look.


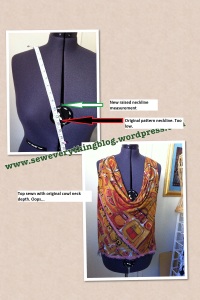
Here is a picture of the original rayon top using Vogue pattern 2611, View E (probably discontinued). The top is several years old and I made it in rayon crepe print in fall colors, happily identifying with the idealized fashion illustrations on the pattern envelope where the cowl fell in a perfect place; I wanted to BE the Vogue Pattern illustration. Are you rolling on the floor laughing? I am now resigned to wearing this pretty top with another layer, usually a camisole.
Instead of discarding the pattern, I sought to raise the cowl depth for the next version of the same view so it would be more – you know, modest. Here’s how I did it with a some pattern manipulation. I’m giving you a choice of two methods where you get the same result.
The upper front on the pattern is the only part you will have to change. Everything else remains the same.
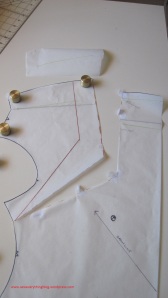
 This is the entire front pattern. Note: this top is designed for a bias layout which is the reason the pattern company suggests that the full pattern be used instead of a half pattern placed on the fold. But for our purposes the pattern will be folded on center front to make the changes easier. As in the picture below where I’m ready to trace the original folded front onto white tracing paper. Once you trace the pattern, mark the bias grainline and the bust point.


To understand the process of raising the cowl, we need to know how the low slung cowl neckline is drafted in the first place, then the process can be reversed. I will only present a picture of a cowl neck draft from one of my new favorite sewing/drafting books, and then detail the process of making it smaller.
The above method of cowl drafting keeps the top fitted below the neck area.
Method 1 to raise a too low cowl neck:
- Measure the original folded pattern from the shoulder point to the center front fold. Decide how much you want to reduce the depth of the cowl. I decided to reduce a good 1.5 inches. Record this measurement.

- Addendum: Thanks to Lisa of the Stitch it Again blog, who commented below, an important step was omitted in this “instructional” post! In answer to Lisa’s question, this is how you determine where the cowl depth will land on your um, cleavage. In the picture above, I’m measuring the pattern (folded at center front) – it measures 11.5 inches. In the collage below, you can see the tape measure on my dress form placed from shoulder to center front (the dial) where 11.5″ is an unacceptable depth. Yikes! I determined that 10 inches would be acceptable, which is the number I used to alter the cowl depth. I hope that answers your question, Lisa. Thank you for alerting me to the oversight.
- Trace the pattern onto white paper as mentioned earlier. On the tracing, draw a line (dotted red line in picture below) from just below the underarm, ending 2″ above the bust point. Pivot this dotted line and continue it straight up to 4″ inside the center front.
- Measure your recorded amount in from the dotted line on the neck (on the straight line running horizontally from shoulder point to center front in the picture. The area above it is the facing). Mark this point. Draw a solid red line starting from the same underarm point and echoing the dotted line as shown in the picture below, crossing the marked point on the straight neckline, which I turned into a green one in pictures further down. The blue line AB is just an indication that the two pivot points echo each other in alignment with the bias grain.

- Cut open dotted line up to but not through the underarm point. See below.
- Overlap by pivoting the shoulder/armhole piece onto the front piece. The overlapped area at the green neckline should measure 1.5″. Use tape to secure. Add a piece of paper to true up the facing, as I’ve done in the picture below.
- Measure from the shoulder point to the center front to make sure it measures 1.5″ less than the original. Be sure to duplicate the same facing shape as in the original pattern.


Method 2 for raising a too low cowl neck (to confuse you even further). You may find it easier:
- Draw a line (red in the picture) from the armhole, just above the notch to approximately 6″ inside the center front. Remember that the green line in the picture is the neckline. The area above it is the facing.

- Cut through this line up to the armhole but not through it, to create a pivot point.

- Overlap this line by 1.5″ (the amount we want to reduce the cowl depth). Again, add some additional paper at the facing area to “true” it. See below.


The above two methods of reducing the cowl will not change the fit below the armhole, and will not change the shoulder length or the dimension of the armhole; it will only make the cowl smaller by raising the shoulder. All of this on the front only; the back remains the same.
Here is the result of the cowl adjustment. Wow. I can’t see the dial on the dress form anymore :). 
The new cowl top is not that new. It has been road tested and worn a LOT. There are some details you may want to know: it was made out of just one yard of silk crepe de chine, on the bias, which resulted in me adding a raw edge silk organza at the hem and calling it a day.
What do you think. my friends? Have you ever had to adjust a cowl? If there is an even easier way, please let me know. I’m always thrilled to see comments here.
Thanks for reading! I hope you enjoyed this post.
Samina

How do you know what the cowl depth will be by looking at the pattern? Your silk top is beautiful and elegant! Which method did you use? I would wear the low necked rayon top by folding the neckline and securing with a decorative pin.
Are those sewing themed pattern weights? They’re so cute.
LikeLike
Those sewing themed pattern weights are so old I don’t even remember where I purchased them!
The other brass weights are from The Sewing Tree owned by Janith Bergeron, and they are beautiful. Janith designed those for using on bridal/evening fabric.
LikeLike
Lisa, thanks for the comment and your question. I’ve included an addendum to the post, step #2 in red and a picture collage, to explain what I should have done when making the first top. The second one is much better because I followed my own advice….. Does this answer your question? Please, please ask me more if there is anything which does not make sense in this post.
LikeLike
Thank you, Samina, it does.
LikeLike
Great instruction Samina! I recognized the silk crepe du chine fabric immediately – I have an oblong scarf out of the same fabric – the scarf must be at least 15 years old but it’s a timeless print and looks super as a blouse.
LikeLike
Thanks, Charlene! I love the black/white silk blouse and have worn it a lot. It still has a lot of “wear” left in it. I think the fabric is from one of the stores in the NY garment district when I visited in 2002.
LikeLike
This will be very helpful for a cowel neck top pattern I have. I can almost guarantee it’s going to be too low as I have to raise the neckline on almost everything. I usually just make the shoulder seams bigger which will only work if the armholes are also too big. Lucky for me, they usually are as well so it tends to work.
LikeLike
PS gorgeous top, love that funky print.
LikeLike
Using your method 2 TODAY and giving you credit for ingeniousness on my blog.
LikeLike
Thank you! I’m thrilled & honored!
LikeLike
Oh my goodness this makes so much sense, a huge thank you! Now I won’t feel uncomfortable wearing cowl neck tops with the right neck drop for me.
LikeLike
Wendy, so glad you found the info useful. Please make sure that you also add to the bust area on the side seam, because, you’re essentially taking away fabric from the cowl neck to make it higher. I am planning a future blog post to revisit this method along with the bust adjustment.
LikeLike
This is great information. Method 2 seems much easier, and doesn’t change the bust measurement.
I have a few RTW cowl neck top made from knits. All of the better ones (more expensive ones) have double fronts. The fronts of the tops just drape and fit so much nicer if the front is double. They are not cut on the bias, but the bodice front folds over at the neckline fold line. Here is one OOP pattern that has a beautiful cowl neckline. The drape is perfect; not too low. The bodice top part is double. The skirt is a single layer. I’ve used this pattern many times to make tops of various lengths. Simplicity 2580 View D.
LikeLike
Correction: Simplicity 2582 View D.
LikeLike
Thanks for your tutorial. My thinking was on the right track and your instructions were just what I needed to “fill in the blanks”. Very helpful!
LikeLike