Dear readers, I can’t help it. Refashions somehow took over my sewing mojo in April and you get to see the results in May. Never fear. Pretty soon you’ll see some sewing items made with new fabric. Meanwhile, so goes another re-fashion….
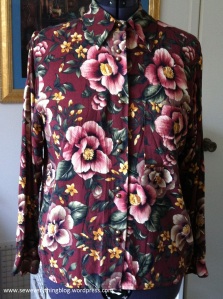
Just what made this blouse so stuffy and old looking? Forget that it IS an old blouse made by a high school-er when she was learning how to sew. She’s a cool adult now. It’s the high buttoned shirt collar and the long sleeves which did not appeal anymore. She pulled out the shirt from dark corners of her closet and took a picture before discarding it. Remember my post about the attachment a sewer feels towards self-sewn items? It was quite evident here.
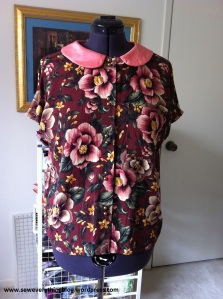
Well, I was having none of this discarding business. I wielded my sewing equipment and skills to make the shirt a little more, shall we say, girly and fresh. The sleeves are now short, the shirt collar was replaced with a Peter Pan collar in contrasting crinkly silk taffeta. The plan was to add studs to the collar to give it, um, “edge”; but that did not happen. The shirt itself is rayon challis in a print which has returned to the fashion cycle this season. I’m pleased with the results, except the original owner really did want to discard it and does not want it back. I guess I now own a hand-me-down; or is it a hand-me-up?
What’s a sewing blog without some technique thrown in? I’ll show you how I made a pattern for the Peter Pan collar.
Implements: Pattern tracing paper or plain paper big enough for half the collar, muslin, pencil, ruler, a round template appropriate for curve of collar front, paper scissors. Optional: gridded cutting mat.
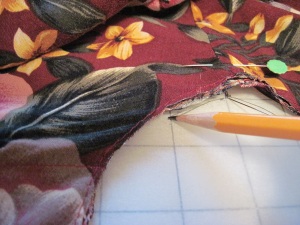
- Stay-stitch just below the neck seam, (where the collar stand meets the shirt neck). This will keep the neck edge from stretching after you cut away the collar. Remove the collar/stand from the shirt carefully just above the stay-stitching.
- You will be working with one half of the shirt. Fold it in half and determine shoulder point and center back by placing at pin at these points. Sometimes a yoked shirt will not have an actual seam on the shoulder point.
- Front of collar: draw a straight 8 inch line on the pattern paper. Place the shirt front edge aligned with this line, and smooth out the front neck edge of shirt to shoulder point. Pin if you have to or place weights on the shoulder so that it lies flat. Don’t worry about the back just yet.
- With pencil follow the neckline from front edge to the shoulder point. Make sure that the shoulder is marked prominently on the paper.
(Important step: determine the center front of shirt and make a parallel line to the front line. Usually the center front is where the buttons and buttonholes meet. Use this new line as front of pattern. Note: the finished Peter Pan collar does not necessarily have to meet at center front. As in my case, I moved the front edges back a little to give the front placket some breathing room. If you’re adding the collar to a placket-less top such as a t-shirt, the collar should meet at the center front.)
- Back of collar: Keep the shirt aligned with the shoulder point by pinning down on the paper. Unpin the front and smooth out the back neck into its own curve. Continue the pencil line from the shoulder point to the folded center back. Draw a straight line aligned with center back.
- Double and triple check at this point that the curve aligns with the front and back – separately. Note: if you were using a paper shirt pattern to draft a Peter Pan collar, you would be able to align the shoulder seams of the paper pattern and thus trace the front and back neck edge all at once. Since the side seams of the shirt are already sewn, you have to trace it a little differently. At least I did……
- Remove the shirt and draw a line parallel to the neck tracing to desired collar width.
- Place a round template at the front edge and trace the half round shape as desired.
- Add seam allowances to all sides except center back, which will be placed on the fold to cut a complete collar.
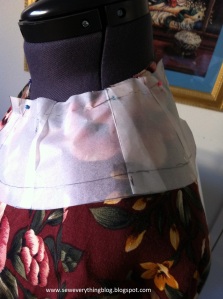
- Sorry, you can’t use this pattern yet. You will have to remove a wedge from the pattern, while maintaining the neck edge. Here’s how; draw a line through the shoulder point to the outside edge. Cut it up to, but not through the neck edge. Overlap cut edges about ½ – 1 inch and tape. See the difference below? On top is the freshly traced pattern; below it is same pattern, all wedged out.
- If you have a dress form, put the shirt on it and try out the paper collar. You may need to do some more overlapping. Remember this is a wedge where the neck seam stays the same.


- Once satisfied, the pattern is ready to use! I made a muslin, approved it and then made the collar, using the muslin as interfacing!

Have you done a similar re-fashion? Anything you want to add to the Peter Pan collar method I used? Any questions?
I’m thrilled that you are reading this post! I will be beyond happy if you write in a comment.
Samina


Ah, love your refashion! The sleeves and collar are really cute now! I’ve never done a Peter Pan Collar but want to for my next blouse project.
LikeLike
Go for it! I personally love Peter Pan collars, and am really glad they’re still trendy.
LikeLike
I know! They are everywhere now. I won a Pattern Pyramid and have just posted it on my blog. Feel free to enter, if you like!
LikeLike